Any piece of software with a lot of functionality also includes a few choices that could be more obvious and that you could overlook. However, Gmail has hidden capabilities that only a few users take advantage of.
Another way of putting it is this, Gmail webpage is the only location where access some configuration options. On the other hand, the settings for different aspects of Gmail are buried deep inside the application itself.
Some are only accessible via the applications, whereas others could only be accessible on the apps designed for a particular system.
You must make regular spelunking trips to get the most out of Gmail. It is imperative when considering how frequently the service’s capacities and functionalities are updated. But you don’t need to worry because we’re here to help you.
Through the options menu of the Gmail account, you can change many elements of your outgoing and receiving email exchanges and the design of your inbox.
Where are Gmail’s settings located?
You may not be able to spot the settings you have set up for your Gmail account based on the device you are using. If you have an Android Mobile and want to modify specific pre-configured settings, you can do so by adhering to the instructions below.
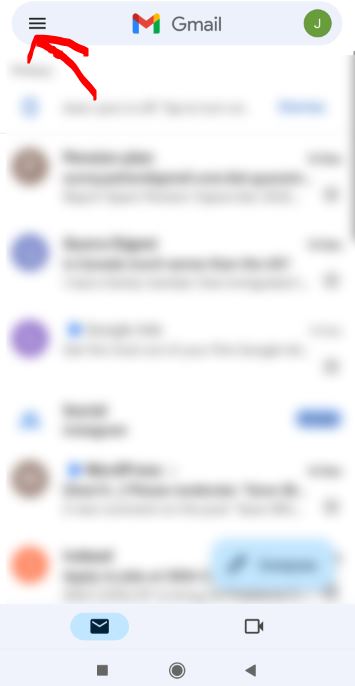
- It would be best if you began by launching the Gmail application on your Android smartphone or tablet. It should be the first action you take.
- To enter the menu, click the three horizontal lines symbol in the upper left corner of the screen.
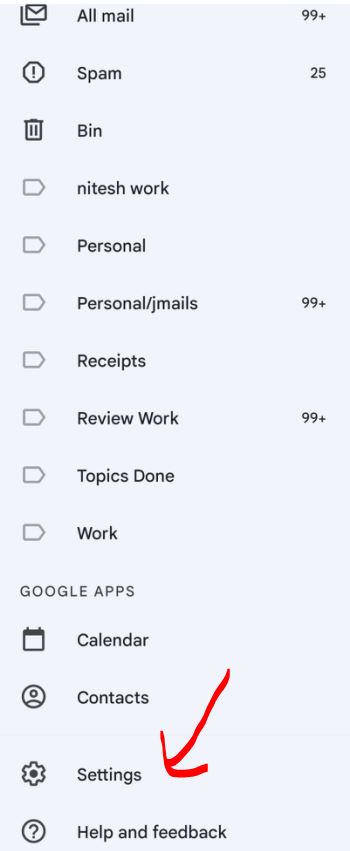
- Third, for the profile whose settings you want to change, choose the settings cog, then the General settings option.
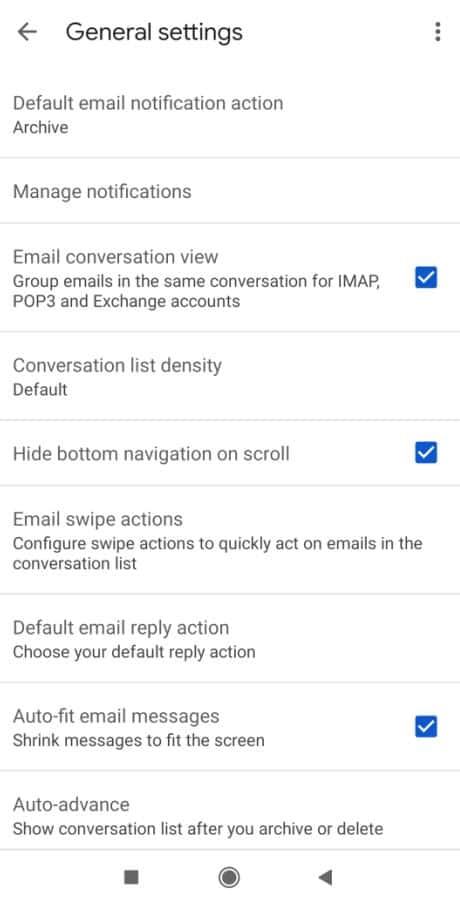
- It will display a pop-up page for you to complete at this stage. You should apply the relevant instructions to each area to make the required adjustments.
The process of modifying your Gmail settings on a windows pc is, in many respects, identical to the process of doing so on a smartphone:
- Your first order of business is to get into your Gmail account using a desktop or laptop computer.
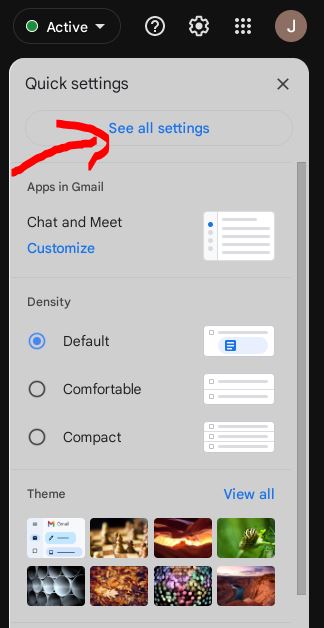
- The second step is to open the Settings menu to the top right of the display and click there.

- Choose “sell all settings” from the drop-down menu.
- After making any required adjustments, choose “save changes” from the page’s footer menu.

Categories of Gmail Settings.
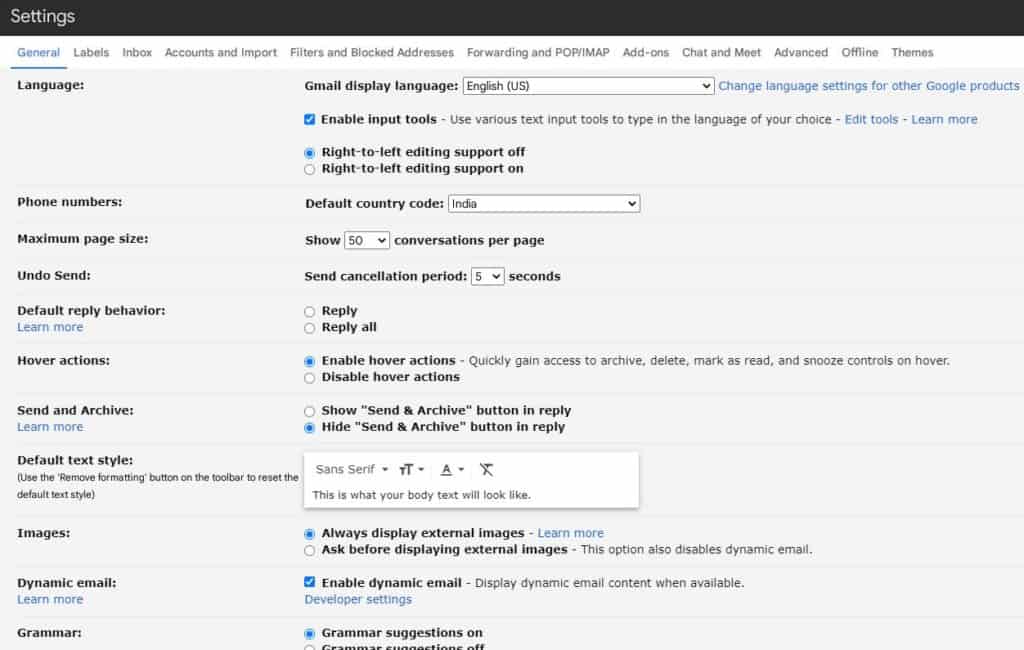
General
This is the place to talk about a wide variety of situations that don’t fit anywhere else. Included in the package are configuration choices for the number of messages to display on each tab, language, grammar, and autocorrection, as well as email campaigns for vacations and your email signatures.
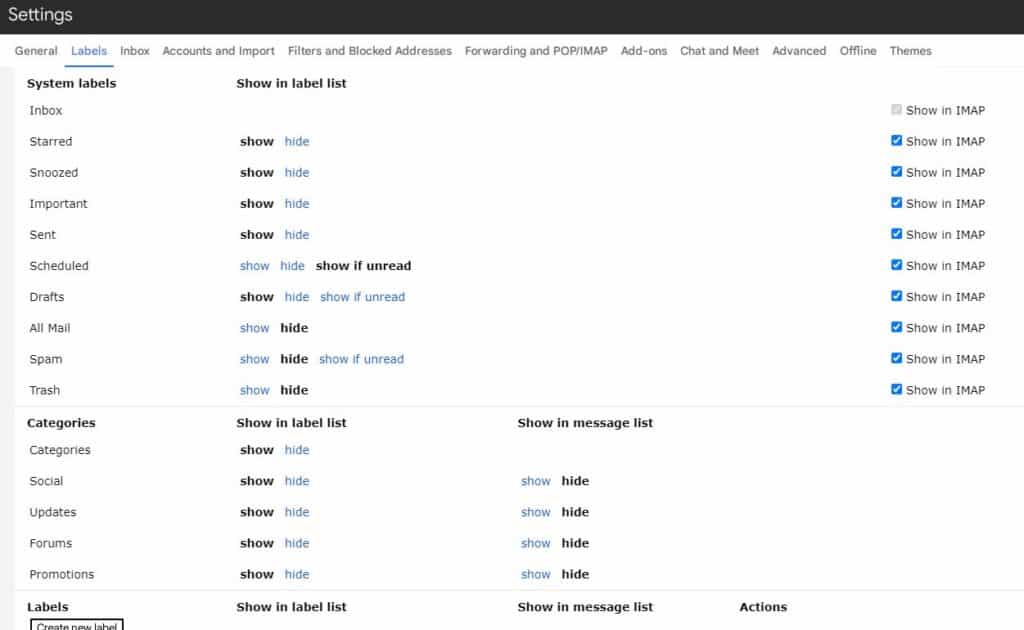
Labels
Using this tab, you can change how visible your labels are on the left pane and the Labels box.
Inbox
You can change the settings for your priority inbox on this page. Modify priority labels and first-shown files.

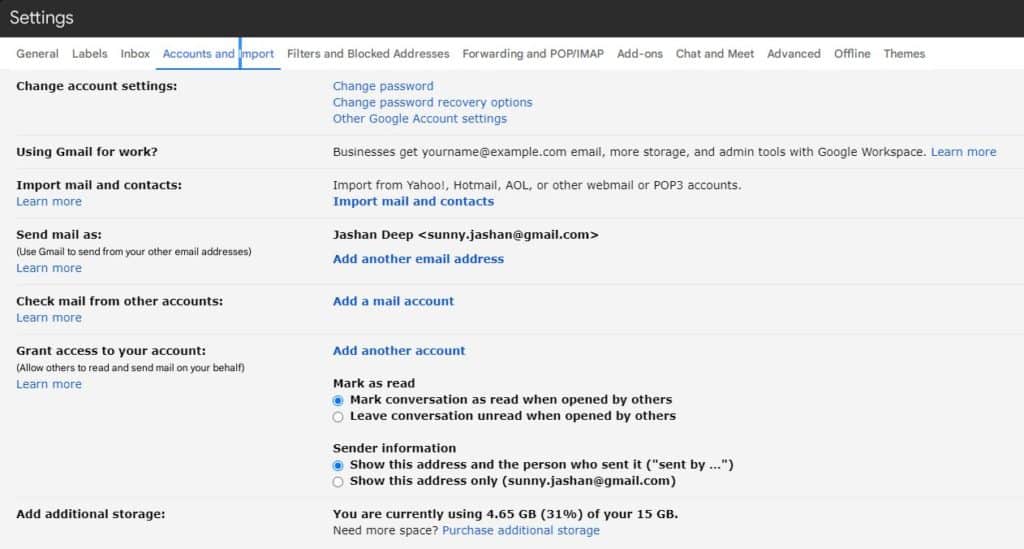
Accounts and Import
You will be able to make changes to the settings of your profile, such as changing your passwords, from this screen. This is the section of Gmail where you may link an email account from another service.
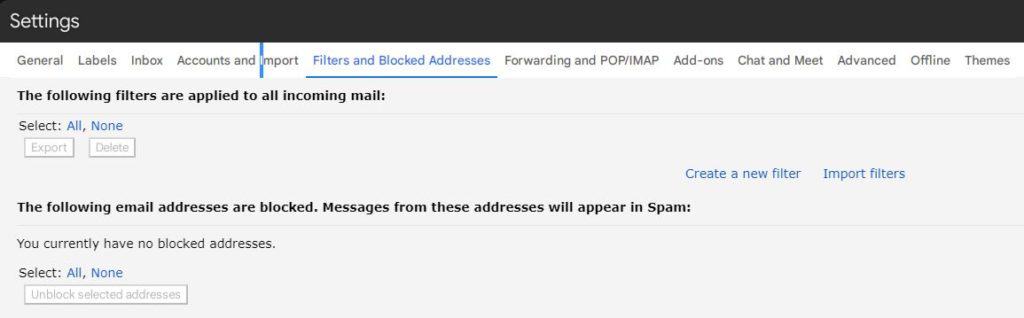
Filters and Blocked Addresses
Here is where you can configure email forwarding and alter your server settings so that you may use Gmail with different email clients.
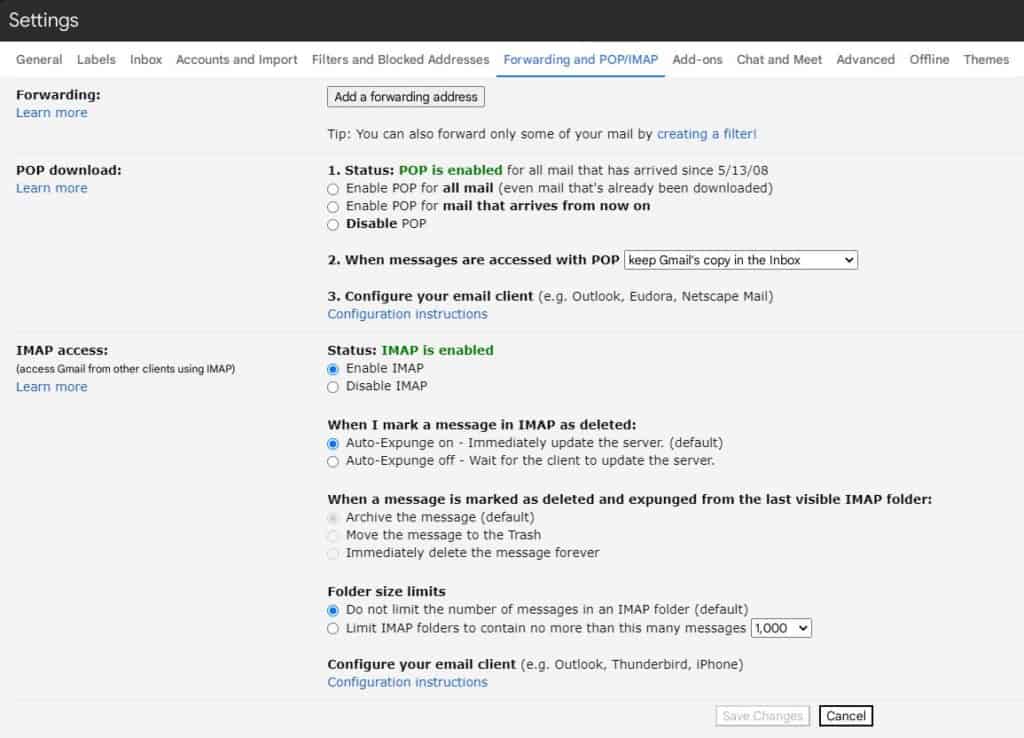
Forwarding and POP/IMAP
In this section, in contrast to customizing Gmail’s server settings for use with other email clients, you can also set up email redirection. This page can find under Options in the Gmail menu.
Add-ons
You can manage any loaded plugins from inside this area of the settings.

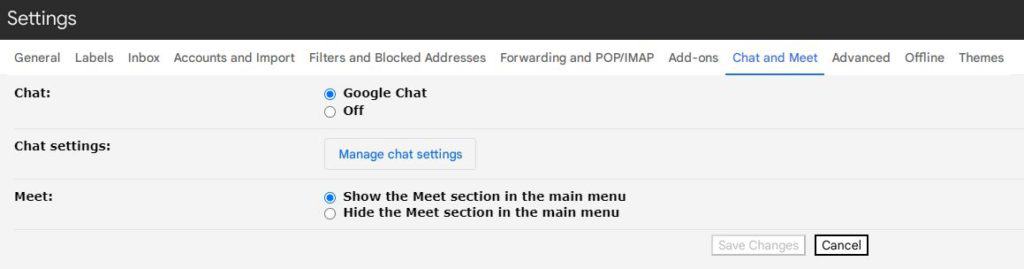
Chats
Users may activate or disable the chat function using a toggle switch in their browser.
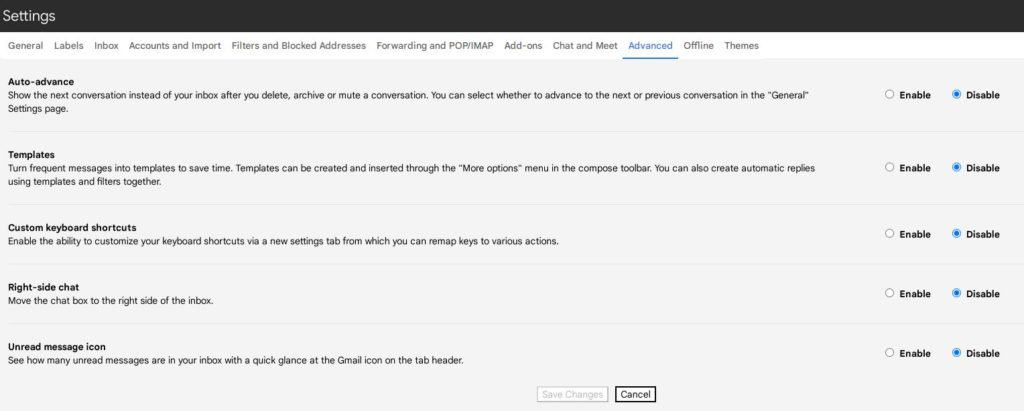
Advanced
On this page of options, you may find more complicated choices, such as shortcut keys and pre-made texts, to play around with.
Offline
In this section, you may choose to activate or disable the offline mode for Gmail, and you can also access additional information in that section.

Themes
In this part of the options menu, you also have the option to make changes to the aesthetic of your inbox.

Google Security Checkup
To get started, go to the section labeled “We keep your account secure” and complete the Security Checkup.
After selecting the Get Started button and signing into your Account, be sure to follow the instructions that appear on the screen. Five components make up this checklist.
Your Devices
You will be able to view all of the gadgets you have access to when you have successfully signed in. You should be able to recognize these gadgets since they have successfully logged into Google using the credentials that you provide.
If you’ve recently parted ways with a piece of technology by selling it or giving it away, you must remove it from the list. Alternately, cross out any devices from the list that you are unfamiliar with if it contains such items.
After selecting the ellipsis, you will see a list of options; choose the one that says “Sign Out.” If you want more explanation, please click on the link marked “Don’t identify a device?” and listen to what I tell you to do.
Recent security events
Recent breaches of security may now be seen in detail. You can view the times and places of all the gadgets you’ve used to confirm your identity and the history of any changes you’ve made, such as a new password or a different email address for account recovery.
In addition, you can see a list of any adjustments you’ve made to your profile, such as a security code or a specific email address for account recovery. Select the button and then follow the directions on the screen if you cannot identify an occurrence.
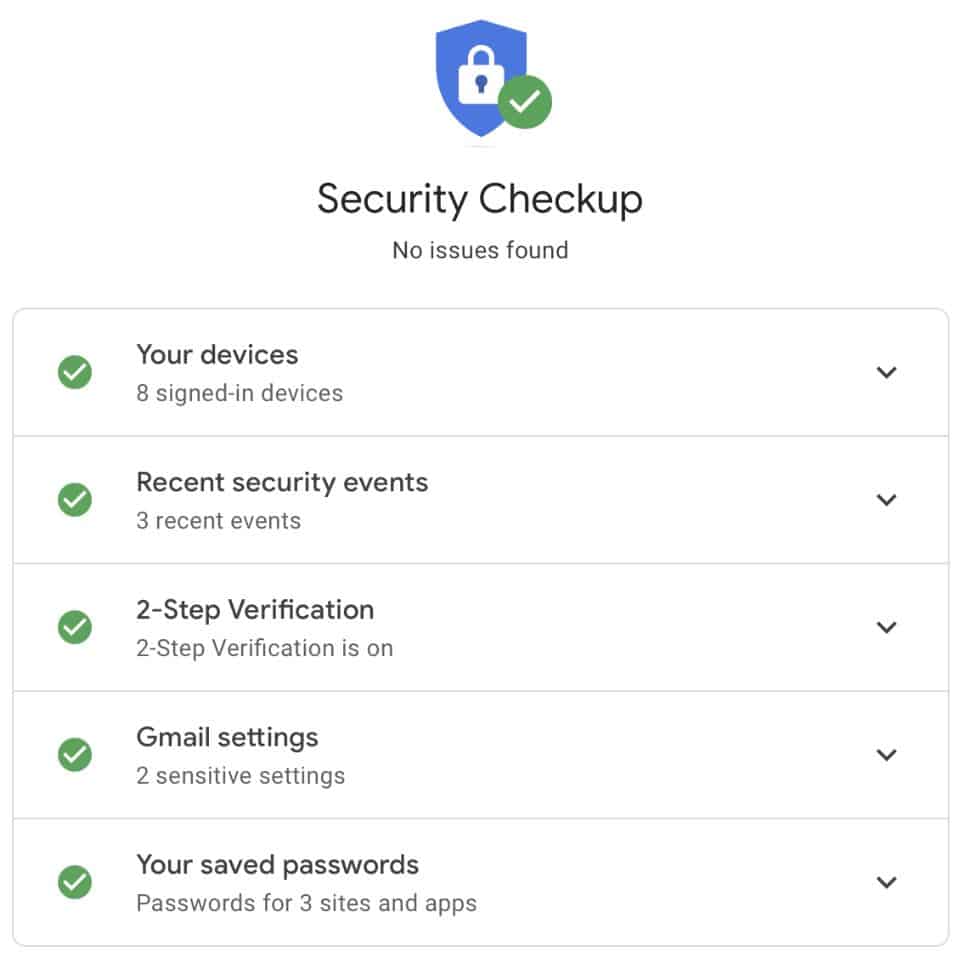
2-Step Verification
The two-stage digital identification technique is explained in detail below. Regarding the deployment of two-factor authentication, a wide variety of various services, including Amazon and iCloud, have been taken into consideration.
You have access to a comparable security option for your Google account, which safeguards your inbox and the rest of your data.
If you still need to do so, now is an excellent opportunity to have everything organized and ready to go. Let’s assume you’ve already set up 2-Step Verification on your Account.
In that case, you will be virtuoso to examine your phone numbers and determine whether or not you have configured an authorization app to produce one-time codes. In such a case, turn on the Two-Step Verification.
Gmail settings
Modifications to Google’s Email Interface, Generally speaking, you may adjust your Email address’s settings inside the service itself.
Once you have returned to the main page of your Account, you can access the extra choices there.
Your saved passwords
In this section, you will find a count of the numerous passwords you’ve established for various apps and websites and an offer to do a Password Checkup on all your passwords. This latter instrument is crucial for checking password reuse and the security of specific passwords.
Personal info
You can change the aspects of your Google profile that are visible to other users in this section. These aspects include your name, date of birth, and password. (Select the Edit Visibility link at the page’s footer to make any necessary changes to the current viewers. “Choose what others see.”)
You can modify your email addresses, phone numbers, and other information as you see fit. A phone number used for two-factor authentication might have its status changed or verified according to requirements.
Data & personalization
This section gives you a few different options to choose from. The Privacy Checkup allows you to select the choices you want to utilize to restrict the amount of private data collected, used, and shared.
This covers everything from your “Google experience” to YouTube and Google Photos, the information others may view, and the ad settings you choose to use.
If you use Google Maps, set it so that it automatically deletes any history of your previous whereabouts.
Security
In the Security section, you’ll see choices almost identical to those offered in the Google Security Checkup. Go to the section labeled “Signing in to other sites” to find out how else you have logged in using your Google account.
We should investigate them further. Whether you use Chrome’s built-in master password or an external password manager, Google Chrome’s Password Vault stores all your stored passwords and allows you to access and manage them easily.
If you give Google permission to access information stored on a third-party service, add that third-party service to your list of Linked Accounts. Be careful to investigate every one of these options.
People & sharing
Suppose you are using an Android device or a Chromebook. In that case, this is the area of the settings menu where you can find your contact information and the options for how other people may access your personal information and location.
Access to in-depth language interface customization options for use with Gmail
Changing the language that Gmail displays may be helpful in several situations. It’s possible that when you travel internationally, your Gmail inbox will only be accessible in the language of the country in which you are now located.
It’s also possible that you altered specific settings on your desktop computer or mobile device, leading to a new language for the user interface. You may easily switch between English and your preferred language using Google Mail.
- To begin, go over to your Gmail account and log in to it.
- Click the cog symbol to view the settings for your Account, and then click the link that says “See all settings.”
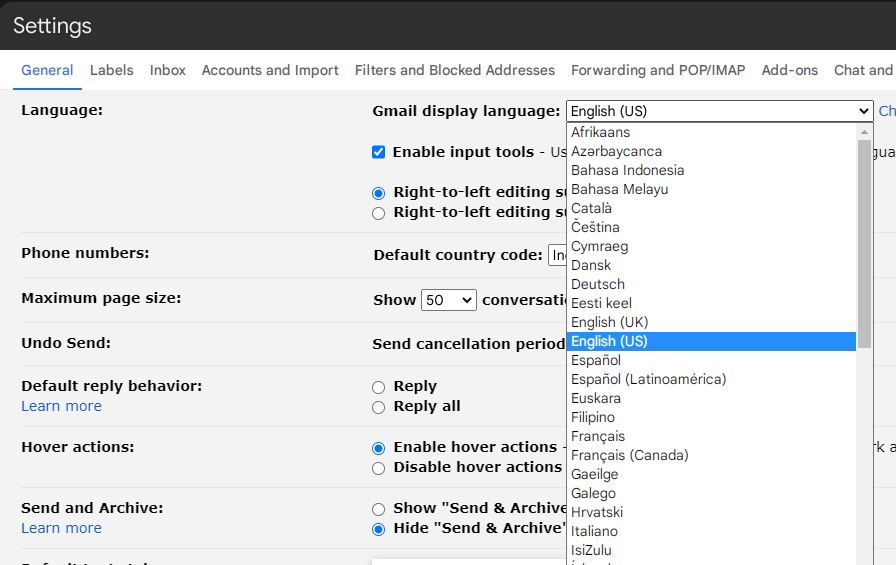
- Third, choose the “General” page from the menu. On this page, you’ll see an option labeled “Gmail display language” and a list of languages you may use to communicate with the service.
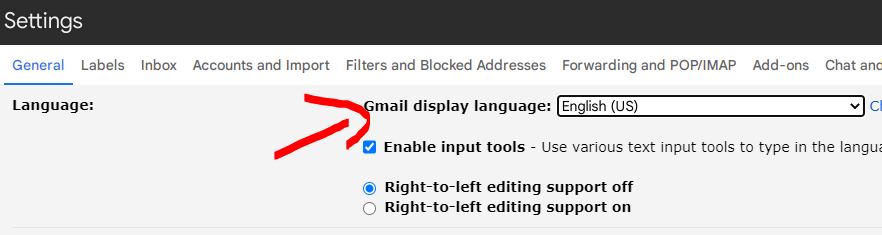
- You can choose the language used by your inbox using the “Gmail display language” option, located in the “General” settings menu.
- After selecting a language, the next step is to make sure that you want to keep it by clicking the “Save Changes” button at the very bottom of the page.

Where can I get information on Gmail’s POP and SMTP settings?
POP Settings
By modifying your settings, you will be able to send emails to users of a variety of different SMTP providers. On the other hand, changing your Gmail settings to use POP will have the opposite impact.
In a word, it makes it possible for you to receive messages sent using email applications other than Outlook.
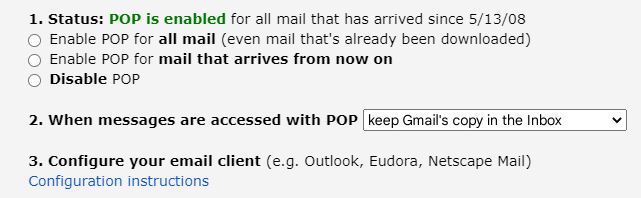
The communication protocols the Postal Service uses are referred to by the term POP. The most current version, POP3, may be seen in your Gmail account settings.
It is necessary to enable this function inside your Gmail account before receiving emails from other POP servers.
- To begin, sign in to your Gmail account and go to Settings by clicking the gear symbol in the upper right-hand corner of the page. After that, choose the option to Show All Settings.
- This activates a panel that provides several different customizing options. Go to the tab labeled “Forwarding and POP/IMAP,” and choose it.
- Step 3: From the POP download menu, choose either “Enable POP for all mail” or “Enable POP for mail that arrives from now on.” Both of these options are available.
This process is essential, given the significance of being able to view your email even when you are not connecting to the internet.
SMTP Settings
SMTP is an abbreviation that stands for “Simple Mail Transfer Protocol.” It makes it easier for email servers to communicate with one another.
For instance, using Gmail with Outlook or Thunderbird as an email client is impossible.
The service can only operate properly with the capacity to communicate with a Gmail server. It performs via the SMTP settings, the same method used with any other mail server you may utilize with Gmail.
Gmail’s Email Spam Filtering Options and How to Make Adjustments to Those Options?
Every day, Gmail’s spam filter parameters improve to a higher level of accuracy.
Artificial intelligence has made it feasible for Gmail to eliminate more than 100 million spam messages daily. Even though this is a start in the correct direction, you still must make any necessary adjustments to the spam settings on your Gmail account.
In this area, you have access to a plethora of different choices. It is the single most frequent modification that users make to their spam settings. Therefore, it is possible to turn off Gmail’s spam filter.
- To begin, open your settings by selecting the cogwheel icon in the upper right-hand corner of your Gmail screen. Make sure you click the button so that you can see all of the available choices.
- Choose the menu item labeled “Filters and Blocked addresses.”
- Since you will need to construct a brand-new filter, choose the option “Create a new filter.”
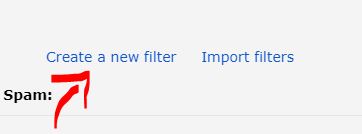
- Type is:spam, or you should use the phrases option for the fourth phase of the process.
- In the fifth step, pick the option to Create a filter using this search, and click the “Okay” button to verify your decision.

- After that, you will go on to the next chapter. Simply checking the correct option will prevent your emails from being classified as spam.
It means you’re no longer letting Google decide which emails are spam and which aren’t.
As was said before, to tweak the spam filtering settings on your Gmail account, you will need to make several changes.
Now that we’ve reviewed the essentials of those options let’s go into the Gmail settings you should be using daily so that you may better organize your inbox.
Add-ons
You may do various errands with these add-ons without ever having to go away from your email inbox. Follow these instructions to search for, download, and remove add-ons from your Gmail account.
- To begin, go over to your Gmail account and sign in. Use the cog (Settings) in the top right corner of the screen to make changes to your preferences.
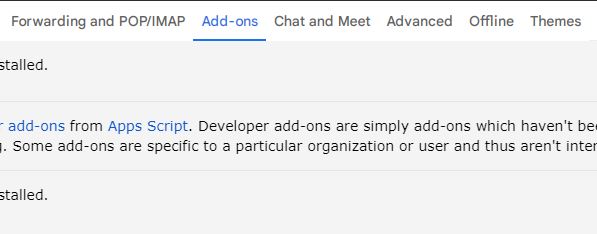
- Select the View Advanced Options menu option.
- Use the Add-ons menu and then choose Handle to configure extensions that have already been installed. This will bring up the Add-ons gallery in Gmail, where you can browse add-ons based on user evaluations, categories, and other criteria.

- Locate the add-on that you want to use and click on it. Select the type of installation you like, and then click the Install and Continue buttons to confirm your selection.
- Follow the on-screen instructions to install the add-on to your Gmail account required to get it up and running.
- You will be able to locate it in the list of accessible add-ons in the right-hand column of your Gmail inbox as soon as it has been configured.
The following are the procedures to remove an add-on from Gmail:
- Log in to your Gmail account, Use the gear icon (Settings) in the top right-hand corner of the page to access your settings.
- -Click on Settings, then click Show All.

- Pick the Add-ons menu option to have access to the currently installed plugins and extensions.
- Simply clicking on an extension will remove it from your browser.
- Select Uninstall from the drop-down section, and then tap on the second icon entitled Uninstall App to uninstall a program permanently.
Advanced Settings
You’ll find the toggle described below in the “Advanced” section of the options panel.
Auto-advance
The following conversation will be shown instead of in your inbox as soon as you delete, archive, or mute a previous thread in the threaded discussion.
You can automatically go to the following or preceding conversation by navigating to the “General” page of the settings panel.
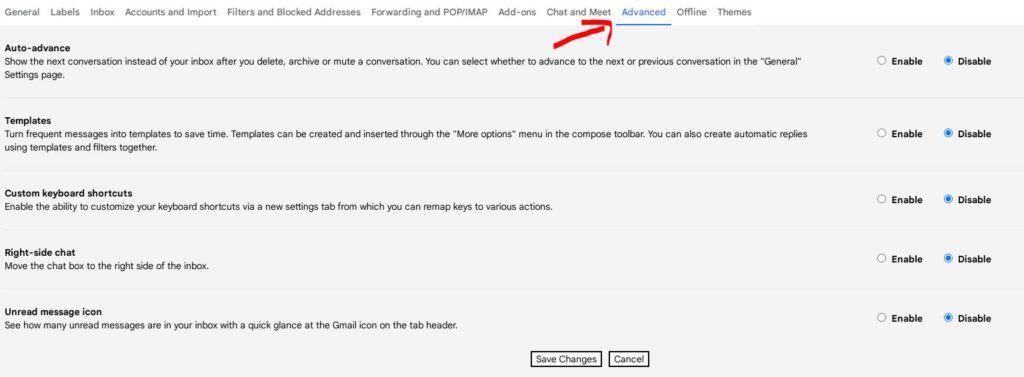
Templates
Make a standard format for the communications you send most often. You can create and utilize templates with relative simplicity thanks to the “More choices” drop-down menu in the compose toolbar.
The production of completely automatic answers is made possible by combining pre-built templates with individualized filtering criteria.
Custom keyboard shortcuts
You can remap keys to perform various actions through a newly added options page devoted to keyboard shortcuts.
Right-side chat
The discussion window should position on the right-hand side of the inbox.
Unread message icon
Look at the symbol for Gmail at the top of the tab to see how many emails you still need to go through.
10 must Gmail Settings You Ought To Change
Undoing sent emails
After sending an email through Gmail, you cannot make changes to it.
However, there is a brief window in which you may cancel a message before it is read. How it works is as follows.
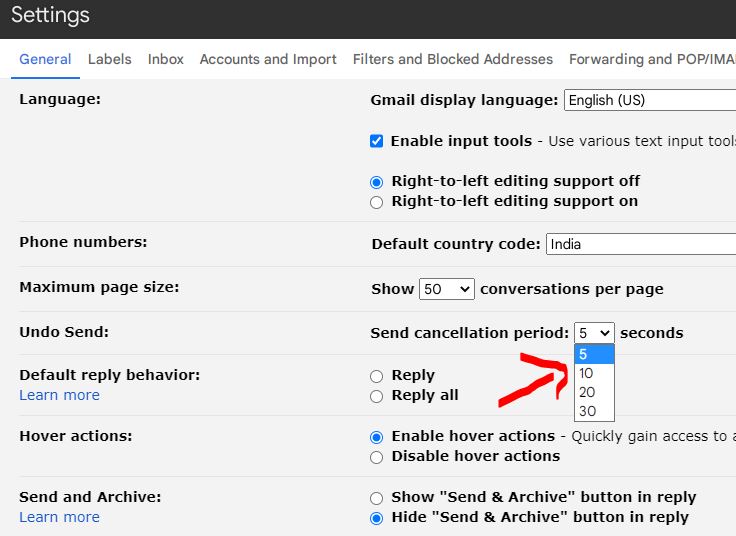
Proceed to the General section of Gmail’s settings. As seen in the screenshot, there is a button to cancel sending.
The following window will appear where you may choose a cancellation time of between 5 and 30 seconds. When you send an email, a window asking if you want to cancel the send will appear for whatever length you choose.
Variable Email Volume
As the name implies, this option lets you adjust the number of messages per inch to fit on your screen.
This procedure is straightforward. To start, choose the gear icon. There are three densities available for selection:
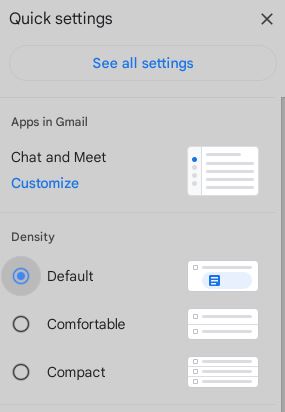
- It displays all emails that have attachments by default.
- Only email content is shown. It lacks add-ons that would free up more room.
- In order to fit more inboxes into a smaller area, the cozy view is shrunk.
Activation and Deactivation of the Conversation View
The conversation view in Gmail is one of the features that is automatically activated once a new account is created.
Because of the way the system is logically laid up, this makes perfect sense. Conversation enables you to monitor the progression of a debate in a single location at any time.
However, some people would prefer that their conversations be made available to the whole public rather than hidden behind a barrier. They believe it is difficult to find a particular message inside a long thread of conversations.
You can choose the one that caters to your requirements the most effectively.
You can turn conversations on or off with the toggle button. Under the “General” tab of the settings menu, you’ll find a switch that lets you turn the conversation options on and off. After that, choose the “Conversation” tab from the list of available choices.

Putting a Cap on the Size of Every Page
Using this option, you can change the number of emails shown on each page.
For instance, if you get many emails daily, it may be a good idea to boost the limit. There is no longer a requirement to click “next page.”
So, let’s have a look at how everything pans out.
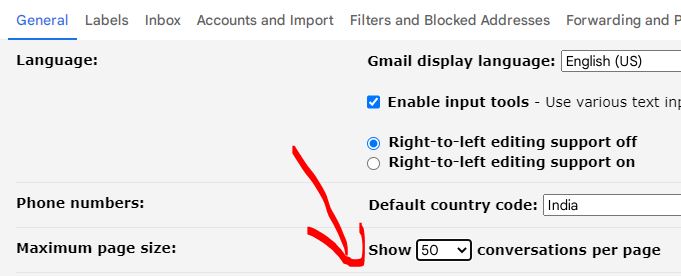
Select Settings to view the menu of General configuration options. Choose the maximum number of emails that can show on each page and the maximum number that can display on each page.
Delivered a Message, But You Haven’t Read It Yet Symbol
This is a helpful option when you need to keep a tab open for a significant amount of time to check your Gmail messages. It is also beneficial for keeping up with emails that you haven’t read in real time so that you can catch everything necessary.
Select the cog symbol in the upper right corner of your Gmail screen to see the more in-depth configuration options. It would be best if you went near the bottom of the list to locate the indication for unread messages.
Simply clicking the button will turn it on. The number of messages that have not been viewed will be highlighted in your Gmail account’s inbox. Remember that it can only handle up to 100 emails simultaneously, so plan accordingly.
Individualization of Rest Period Routines
You can discover that the snooze feature in Gmail’s default settings does not work for you, despite being somewhat helpful.
The fact that you cannot change Gmail’s default settings is a peculiar yet fascinating feature.
You will need to make the necessary modifications inside the note-taking program known as Google Keep. It still needs to be why Google chose to exclude this feature from Gmail’s roster of available options.
Nevertheless, this is the method that has to be followed.
- You may access Google Keep by selecting it from the menu associated with your Google account (the white bulb inside a yellow box). A menu for adjusting the settings will appear in the top right-hand corner of the display.
- You can customize the timings that the morning, afternoon, and midnight reminders are set at. You must save your work after you have completed it.
- Return to your Gmail inbox and snooze one of the messages you have yet to see. When you switch to the pre-selected option, you will see an up-to-date and customized version of your schedule.
Abbreviated Shortcuts for the Keyboard
When you need quick access to anything, the vital shortcuts in Gmail come in handy. You may use them to do a variety of things.
It’s good to learn and use these tricks, but it’s much more useful to create your own unique, high-performance shortcuts.
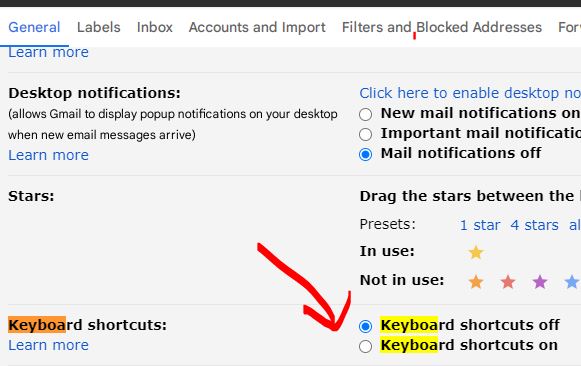
Nevertheless, before proceeding with that, let’s check whether the keyboard’s shortcut keys are enabled. Select “Settings” from the drop-down menu to make basic adjustments to your computer’s configuration settings. Activate the keys for instant reaction.
Now that we’ve gotten that out, you should show that you can innovate by creating your shortcuts inside the organization.
But hold on, there’s a caveat. The only components of the user interface that you may customize are the primary menu and the keyboard shortcuts for managing your email.
- You will need to activate the keyboard shortcuts to do it. To access the more sophisticated settings, select the icon labeled “Settings.”
- You may activate them by going to Settings > Keyboard Shortcuts > Customize on your device.
- Take care to save your work after you’ve finished it.
A new tab with the name Keyboard Shortcuts will appear whenever you want to use the shortcut keys. Simply clicking on the link will take you to the destination page.
Every function has its specified shorthand that may use instead. You might adapt it to something easier to keep in your mind.
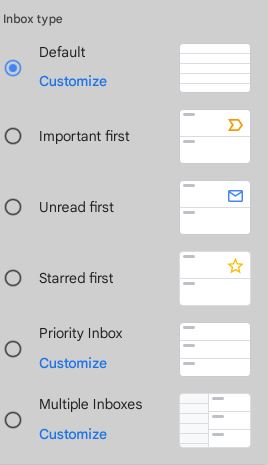
Putting an Email Into a Priority Inbox, You Can Check
The Priority inbox is a distinct inbox that intends to organize and prioritize specific messages, as suggested by the name of this feature. This applies to every one of your emails, not just the ones you’ve highlighted or labeled “essential.”
How does Gmail determine which messages should be given the highest priority? Look at the user handbook we discovered on their support website.
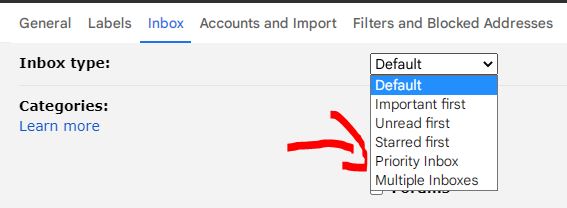
To get started, go to the Settings page of your Account and then head to your inbox. The Priority mailbox is an option that may select from the drop-down menu of inboxes.
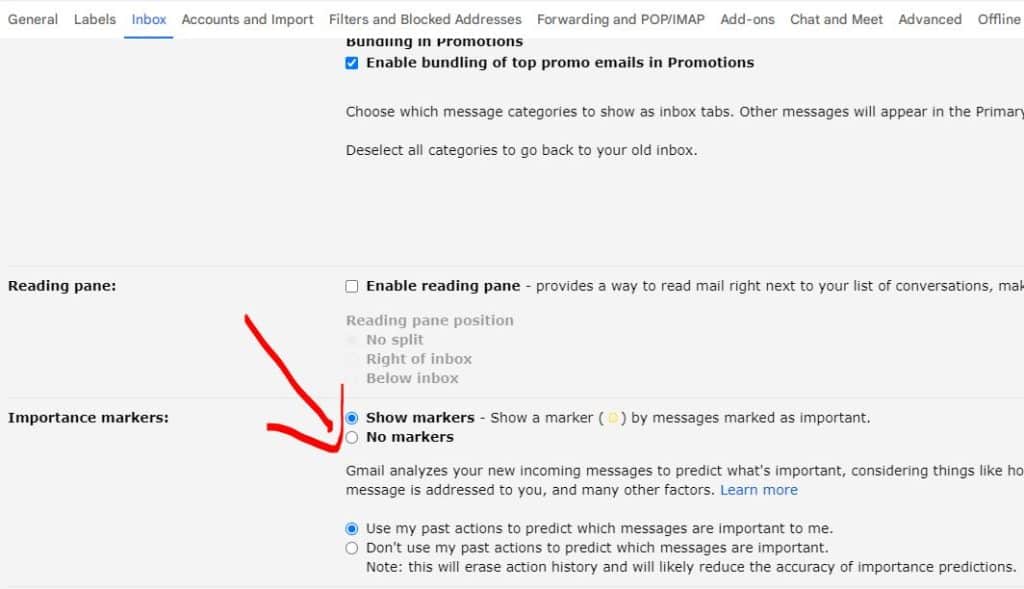
Notable Indicia Expands
It examines the messages in your inbox, considering how often you get correspondence from particular individuals and how you’ve replied to their statements in the past.
After that, it will evaluate each message to decide which ones are worth marking, and it will do so appropriately.
What kind of implications does this have…? You don’t have to spend much time sorting through your inbox to find critical messages.
This section explains how one may shape the environment that they are in.
To access your inbox, choose it from the drop-down menu that appears after you enter the settings panel. Find the section labeled “important markers,” and then click the option “show markers.”
Either put the nudges on wait or go all out.
It is in our nature to forget things, yet doing so might cause us to miss out on opportunities that could lead to a more fulfilling existence.
According to research by Hubspot, most customers anticipate receiving a response to each and every email they send within ten minutes of sending it.
If you’re the “too forgetful” kind that uses Gmail, taking advantage of this feature may be helpful.
Select the General submenu once you are back in the main settings menu. This is where you find the “nudges” subsection in the guide.

Both “Suggest emails to reply to” and “suggest emails to follow up on” are available options. You are free to pursue any one of the two options or even both of them.
FAQs Regarding Gmail’s Preferences and Settings
What are the several methods you may use to access Gmail on your mobile device?
When compared to setting Gmail on a laptop, the mobile app for the service offers a reduced number of options.
You are able to make tweaks to the default settings, however. Please go back to the beginning of this book if you need a refresher on how to utilize the essential settings on your Android phone.
How do You configure Gmail so that it functions appropriately?
When it comes to personalizing your Gmail experience, the number of available customization choices is almost limitless.
The information that we have given you up to this point is just the beginning. This gives rise to the question, “What is the most important configuration?”
To put it simply, there is no setting that is more important than any other. What you do with Gmail depends on the choices you make and the goals you set for yourself.
Changing your Gmail options to fit your needs best has never been easier.
How to modify my Google account settings to better protect my privacy?
Changing the privacy settings on your Google account is all it takes to improve your time spent online vastly.
To activate it, you’ll need to go into your settings. Picking security is a good way to get some peace and quiet. You have the ability to adjust to a wide variety of settings. What makes the most sense to say is up to you.
What Is the Recommended Frequency for Changing Your Gmail Preferences?
To provide its consumers with the best service possible, Google Mail is constantly tweaking its settings. If you are utilizing a previous version of the Gmail application, you may not have access to the most current configuration options.
In addition, you may access the most recent information by clicking the Help button, which is in the shape of a question mark.
Does Google Mail Enable You to Alter Your Username at Any Time?
If you already have a Gmail account, but you’d want to change your name, you’re free to do so whenever you choose. If you have changed your name an excessive amount in a short period of time or if you have received a message that said “changed too recently,” you will be required to wait three months before changing it again.
You may change the email address to that Gmail sends messages from inside the settings of your Account.
After choosing “See all choices” in the “Settings” menu, a drop-down menu will appear. From this menu, choose either Account and import or Accounts. Type in the new address you want to use in the “Send mail as” area.
As soon as that is complete, you may start utilizing your new “From” alias or another email address when sending messages.
Can I access all of the setup options for my Gmail account from any device?
The Gmail mobile apps for iOS and Android do not provide all of the settings options available in Gmail. Only by making the adjustments directly in your browser can you be sure they will stick.
How do I have control over the email address I use for Gmail?
If your email address is currently set up to end in @gmail.com, you will likely be unable to make any changes. Get in touch with the administrator responsible for your institution, firm, or organization if you need help with a Google Account affiliated with one of those entities.
How does one typically make use of Gmail?
Email users may join up for the free Gmail service offered by Google. Gmail is on par with other email services regarding the basics of sending and receiving email messages.
You can send and receive an email, remove unwanted messages known as spam, and compile a contact book.
How long have users been able to use Google Mail?
Since 2004, Google has provided free email via its Gmail service. Because Gmail from Google is a webmail service that is free to use and financed by advertisements, you can use it with any email client you like.
Can someone assist me with my Google Account?
There can be only one primary user with access to a specific account at any time. The promotion of their companies may be accomplished via the use of Google products that are enabled with Brand Accounts, such as Google Photos and YouTube. Except for YouTube, managers of communications have access to all the tools that managers generally have.
Are you able to read my emails in private?
It is a safe assumption to make that the recipients of an email you have sent, together with yourself, will be the only people able to see its contents.
Email is, in reality, one of the least secure communication methods, so, unfortunately, that statement is inaccurate.
What is the total number of users logged into your Gmail account?
You’ll see all of the places, including workstations, phones, and other devices, where you’ve signed into your Google Account shown here, including all of those places. Signing in to your Gmail account at google.com/devices will allow you to check that nobody else is using your Google account.
What are the essential features of Gmail, summarised in just three words?
Software for organizing and filtering incoming and outgoing emails You may step up your game with email by using intelligent capabilities like brilliant writing and smart responses.
Issued email notifications of high-priority warnings and mild nudges. Use Gmail’s online tools to save your vacation details in one place.
What are the five different tabs available in Gmail?
You can create several tabs inside Gmail to organize the various components of your inbox. These categories are Primary, Social, Updates, Forums, and Promotions, respectively.
If you use them, Gmail may split your inbox into many tabs, allowing you to focus on the messages inside each Account.
I hope this article provides you the complete information about Gmail and its settings.