Foxit Phantom PDF is one of the best PDF editing tools, and the best thing is that it works on all platforms, such as your iOS devices, Windows PC, and Android devices. It is easy to use and faster in speed. In our previous tutorials about Foxit, many inquiries are there regarding how it works. So we asked the Phantom company to provide us trial period and see how PhantomPDF works. Many other PDF software such as Nitro Productivity Suite, PDFElement Pro, and much more, are the best alternative to Foxit Phantom that you can try. So let us proceed with how to use Foxit PhantomPDF.

Is there any alternative to PhantomPDF?
We are comparing other PDF editing tools; we find Nitro Productivity Suite is its best competitor. The only drawback is that Nitro Pro works for Windows PC, but PhantomPDF works for all. You must try if you have Windows PC. Still, we made a tutorial that enables us to work with Nitro Productivity Suite on your Macbook. This is simple to use, and navigation is easy to locate. Read the complete Nitro Pro Review.
Without going much deeper inside any other discussion, let us quickly see how to use Foxit PDF, from editing a simple text to adding a signature using Foxit PhantomPDF.
How to Use Foxit PhantomPDF
This tutorial will cover basic editing to advanced features such as document sign.
- How to edit a PDF document?
- PDF format conversion
- Editing PDF images
- How to use Metadata in PDF?
- Adding Header & Footer to PDF document
- Importing and Exporting Form Data
- Inserting Signature to PDF
- Secure paper with connected PDF
- Foxit Cloud service
We suppose all the above-listed features cover exclusive features, but there are many other features that we can check out in another tutorial. Let us check them individually.
1. How to edit a PDF document?
Most people find that PDF is only a readable document, but that’s not true. If you have good PDF software, every PDF change is possible. Follow some below.
- Launch PhantomPDF and open the document to edit.
- Tap Edit Text on the menu list (top-center of your screen).
- Now place your cursor on the text where you want to make changes. You can edit the text by selecting the text and pressing the backspace button or adding text by simply highlighting the area.
This simple text editing on PDF. You can change the font, text size, margins, and other things here. You can also resize the text and font style. For this, go to the EDIT tab.
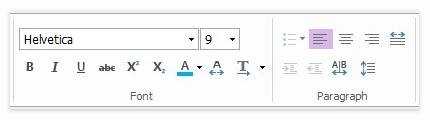
With this, you can also use the Bold, Underline, and Paragraph layout option for your PDF document.
2. PDF format conversion
Unlike other PDF utility software, taking lots of time for conversion of format. PhantomPDF works instantly; within a few seconds, you can convert your PDF to any structure or vice versa. Let us take an example of converting the format from PDF to Word. Follow some simple steps.
- Go to the online tool free online converter.
- Tap on the Select your file button.
- Now click on Convert Now button.
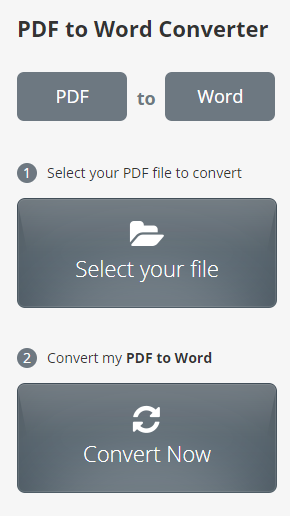
Once done with these steps, check your document location for the newly converted file.
3. Editing PDF images
You can easily add, move or delete an image if you want any correction in your present PDF. PhantomPDF makes it easy for every user. We are first-time users, and we don’t find any difficulty with some clicks; we edit the PDF images.
Adding Image to your PDF
- Open PhantomPDF on your system.
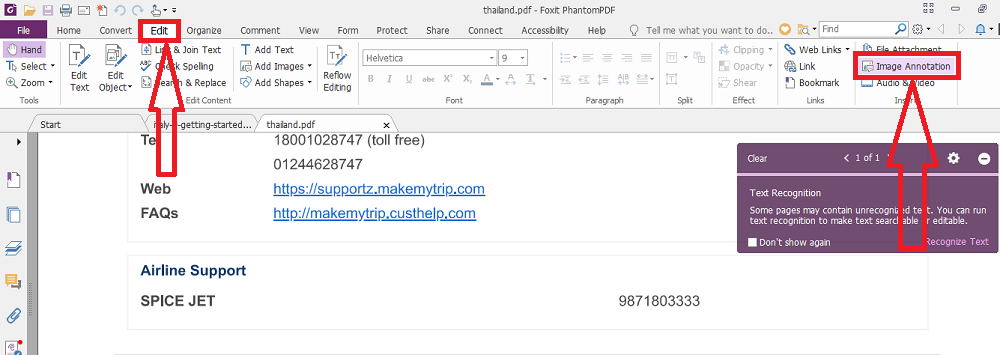
- Navigate EDIT > Insert > Image Annotation.
- The box (rectangular) appears; place it on the space where you wish to add the Image.
- Browse the Image and select it.
Here you will see the Image will be added there, and you can specify its dimension by going to the Advance option to further settings. Now we have a quick look over moving a PDF image.
Moving Image or relocate
- Select the Annotation Selection Tool and place the cursor on the Image to open settings.
- Move the cursor to the location where you wish to move the Image.
4. How to use Metadata in PDF?
Metadata specifies information related to copyrights, author detail, PDF creation detail, the application used to create PDF, and other such data. To be more specific, this is used at a higher level when talking about Metadata. Let us check how to use Foxit PhantomPDF to insert Metadata in PDF.
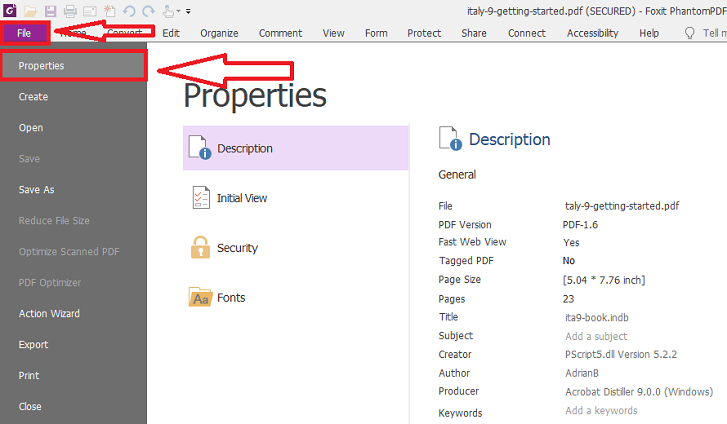
- Click on the File menu and go to Properties.
- Edit the information from the list such as Author, subject, keyword, URL, date of modification, date of creation, and other things under Description.
5. Adding/ Removing Header & Footer to PDF document
To show specific things with each page of PDF, it becomes essential to show readers the detail of that page; suppose if you want to add the date of modification at the header or the footer, then with PhantomPDF; the work becomes quite simple.
- Tap on ORGANIZE tab on the top menu list.
- The drop-down submenu appears; tap on Header & Footer option.
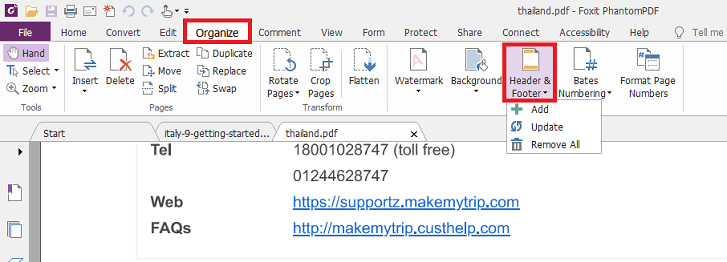
- The pop-up screen gets appears. Different options appear on the screen, such as Left header text, Center header text, Right header text, and similar to the Footer option. Add the text where you want to place it.
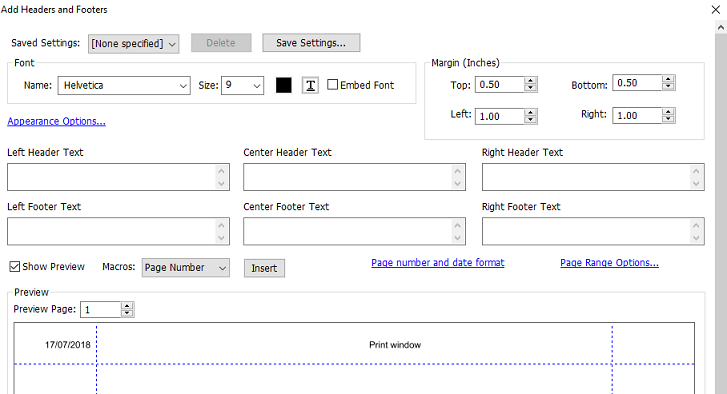
- Doing this can exclude specific pages where you don’t want to add Header & Footer, such as a cover page. For this, go to Page Range Option.
If you already have a Header or Footer and if you want to remove then navigate to ORGANIZE > Page Marks > Header & Footer > Remove. Click Yes on the next prompted page, and now it gets disappears.
6. Importing and Exporting Form Data
If you are unfamiliar with this term, let us make it simple to understand for you. Suppose you are interacting with many people at a time and have provided them with online forms to fill out some details you mention. You can easily create a PDF form. Collecting individual form information and forwarding it to your company in less time is impossible. So PhantomPDF performs its functions at that time. It only contains the mentioned details on the form and stores them in your database. Whenever you want that detail, PhantomPDF opens all interactive forms. To use this feature, follow some steps below stated.
- To export the form data in FDF format, use the App Foxit reader, which is free to use.
- Navigate to Form > Form Data > Export > To File.
- Under Save as type, choose the location and specific format.
- Tap the Save button.
You can easily enable the Form data import and export option by performing the above steps.
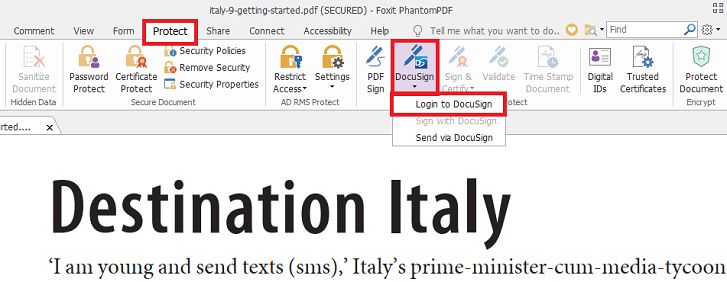
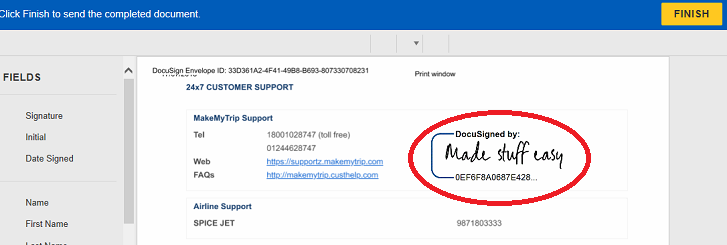
7. Inserting Signature to PDF
Adding a signature to your document is a seal of trust. It seems to be a verified document if you have a signature on your PDF documents, such as bills, invoices, or official documents. Thanks to PhantomPDF for providing such a great feature with one of the best document sign agencies DocuSign which is fast and easy to use. DocuSign is a verified high level of compliance with security standards and eSignature regulations. Follow some simple steps to apply eSign using DocuSign.
- Tap on Protect tab on the menu list; in the drop-down submenu, click on DocuSign, and sign in.
Must see: How to protect PDF with double encryption?
- Once your Signature is completed, drag and drop to the place where you wish to add it.
8. Secure document with ConnectedPDF
ConnectedPDF is a powerful tool you might not be aware of. Let us make it understandable by having an example. Suppose you have a ConnectedPDF document and you have sent it to many clients, but after sending you might notice that your paper has some essential details that you must not share with all the clients. There comes the role of ConnectedPDF; even if you have sent a ConnectedPDF document still, you can restrict the readability to the clients even if your clients have opened a PDF.
- For ConnectedPDF, sign in to the Foxit account if you don’t have to sign up and open the PDF to convert.
- Windows users navigate to Connect > Create ConnectedPDF > Convert to cPDF..
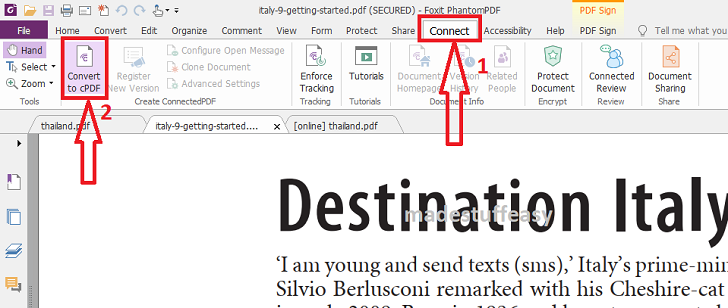
- Mac users navigate to Connect > Convert to cPDF.
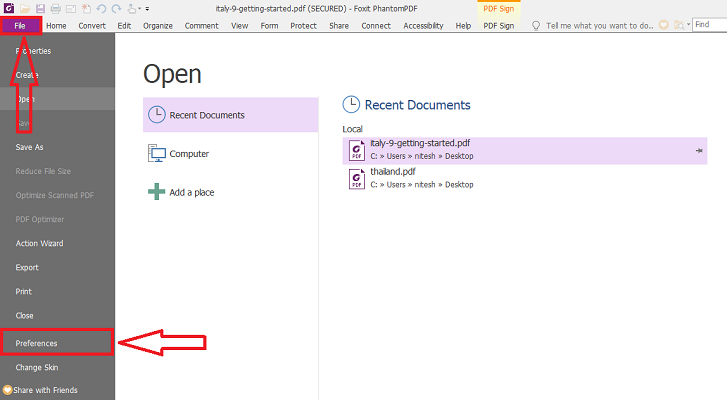
Foxit allows users to convert the existing PDF to the ConnectedPDF automatically. For this navigate to File > Preferences > ConnectedPDF.
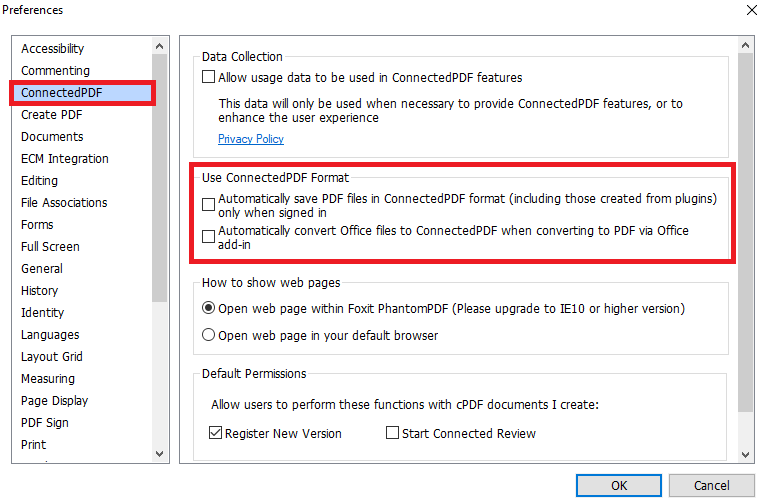
- Check/ uncheck Automatically save PDF files in ConnectedPDF format.
NOTE: To open ConnectedPDF in other systems, a Foxit reader is required. Here is a quick download link.
9. Foxit Cloud Service
Uploading your document to the cloud makes accessing your documents easy and convenient. You can use those documents from anywhere by simply signing into your account. Foxit cloud service was terrific when I first used it. Uploading is fast and easy to navigate. Foxit allows its users to provide complete security over the documents shared.
Visit Foxit PhantomPDF Website
These are the top required tools that are mainly used. In our work, we find PhantomPDF as the most fantastic PDF software. There are many other great features that you must need for your work. The best part is shaving a quick navigation shortcut on the left side.
We hope this tutorial about how to use Foxit PhantomPDF is helpful for you and you successfully understand PhantomPDF. For more tutorials, reviews, and best deals, follow us on Facebook and Twitter.