There are occasions when our system still stutters and freezes even though we have plenty of RAM. This problem may be caused by insufficient storage space or by the presence of a superfluous background process. Removing automatically generated temporary files is one technique to avoid this slowing down our system.
Applications create temporary files to store data on your computer temporarily. There are many more temporary files in Windows 10, such as those left behind after an update or installation, upgrade logs, problem reporting, temporary Windows installation files, and so on.
There shouldn’t be any problems with these files in most cases. But they may expand rapidly, eating up significant space on the hard drive, which might prevent you from installing a new version of Windows 10 or cause you to run out of space on your computer. Safely erasing temporary files is easy with Windows 10, with options like the Settings app and the Disk Cleanup program.
Many reasons make your computer slower, consume unnecessary storage, show multiple errors, and take time to turn on and off. This tutorial will boost your PC speed if you face such problems. I suggest you follow every method to improve your PC’s performance by deleting temporary files on Windows 10. But if you are looking for the easiest method, which I used and recommended, is the last method.
What are temporary files, and how do they enter your PC?
As the name implies, these files are temporary and hold data until the process continues; as soon as the process stops, these temporary files become redundant. Bit complicated? Let us make it clear by taking an example, as it is essential for you to know what precisely the temporary files are.
Suppose you are using powerful data software, such as video editing software. To run the functions smoothly, your operating system creates temporary files and holds the information for the time it is used. Once the process is completed, the temporary files no longer work. You can also consider them as recovering files during the process going on as they temporarily save your data. Now the picture is more precise, I guess!
- Must-Try: How to factory reset Windows 10 PC without Disk Installation?
- How to repair Windows 10 using the Automatic Repair feature?
Where Are Temporary Files Located?
Mainly Temporary files are located in two locations on your Windows 10 PC.
- %systemdrive%\Windows\Temp
- %userprofile%\AppData\Local\Temp
Temporary files are in the format ending with .tmp, .temp. It may be noted that once the program closes, the temporary files don’t need to be cleared.
Related: How to change file extensions in Windows 10 PC?
How do temporary files affect your Windows 10 PC?
Temporary files keep increasing with every program you use, the application you install, and the software you access. These files may increase from several MB to several GB. Does that sound annoying? Yes! That’s a reality. Temporary files may consume several GBs of memory, resulting in slower PC performance. Speed is the most significant factor affected by temporary files.
It is always recommended to delete temporary files on Windows 10 to keep your PC fast and healthy. Clearing all temporary files to optimize your PC’s performance has many ways.
Are temporary files safe to delete?
As the name implies, temporary, which means these files are temporary and are safe to delete from your PC. However, the currently running program still has some temporary files which you can not delete at this time. In our previous topic, How to remove junk files from PC, our readers were confused about whether it was safe to delete temporary files or not, so we extended our details on this topic to make things clear.
How to Delete Temporary Files on a Windows 10 PC?
Here we will discuss the best ways to clean up temporary files from your Windows 10 PC. Here we are using some of the best ways to delete all temporary files and extract the space that is unnecessarily occupied.
- Deleting temp files by manually locating temp files
- Removing temp files using cmd
- Cleaning temp files on a Windows PC using a batch file
- Using utility software to delete the files
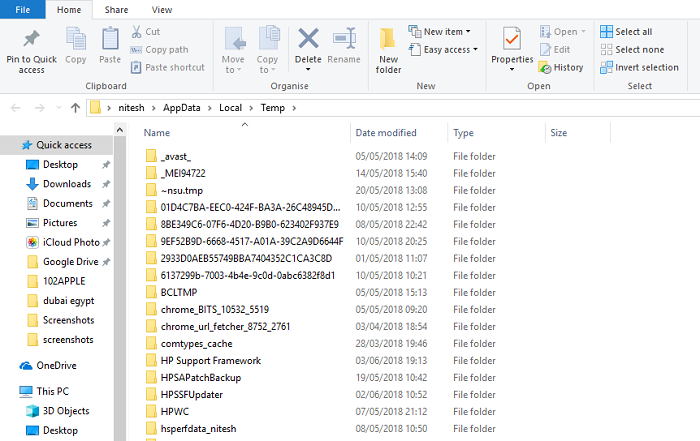
Method 1: Deleting Temporary Files By Manually Locating Temp Files
- Open the Run dialogue box (Win key +R).
- Type %temp% and press the Enter key.
- Here you will see the complete list of temporary files stored on your PC. You can easily remove them.
- Select all the temp files and delete them.
Once you have deleted them, go to Recycle Bin and remove them permanently from your Windows 10 PC. Another way to check out all the temporary files, which are usually recommended, is by using a command prompt.
Method 2: Removing temp files using cmd
- Open Command Prompt. Run cmd as an administrator.
- Type the below command and hit the enter key.
del /q/f/s %TEMP%\*

This will delete all your temp files. Another method that most people prefer is using the Disk Cleanup utility.
Method 3: Clean temp files using Disk Cleanup
- In the search box on the Windows 10 screen, type “Disk Cleanup” and hit the enter key.
- Now select the drive you want to clean. From the drop-down list, you can easily choose one. Click OK to move next.
- From the list of cleanup options, choose Temporary internet files and Temporary files.
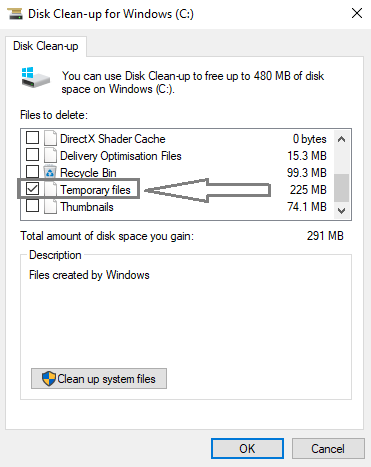
- Click OK and reconfirm the deleting option by clicking Delete Files.
By this, you successfully delete the temporary files using Disk Cleanup.
Must Read: How to increase internet speed using cmd?
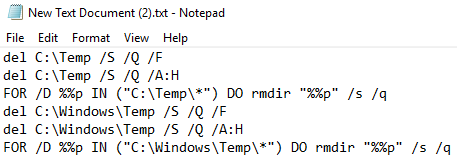
Method 4: Deleting Temporary Files Using Batch Files
Deleting all temporary files in one go from C:\Temp and C:\Windows\Temp. Follow the below script.
del C:\Temp /S /Q /F
del C:\Temp /S /Q /A:H
FOR /D %%p IN ("C:\Temp\*") DO rmdir "%%p" /s /q
del C:\Windows\Temp /S /Q /F
del C:\Windows\Temp /S /Q /A:H
FOR /D %%p IN ("C:\Windows\Temp\*") DO rmdir "%%p" /s /q
Method 5: Alternate Way to Delete Temporary Files on a Windows 10 PC
This method is the default offered by Microsoft to check the amount of memory the temp files are consuming. Let us check how this works and how to remove temp files.
- Open Settings on your PC. Type settings in the search box below if you cannot locate them.
- Look for the System option, and click on it.
- On the left-hand side list, go to the Storage option. On the right side, choose the Local storage you want to check the storage (Usually C: Drive).
- Hold on for some seconds till the Storage Usage displays. You can see how much storage your temp files are occupying. In my case, it is more than 5 GB. (I hadn’t expected this much).
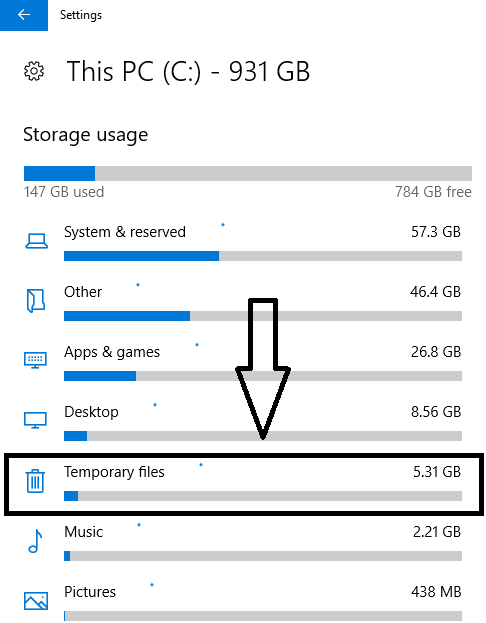
- Double-click on the Temporary Files option, choose the specific files to delete and click Remove files.
By this, you can quickly check the amount of capacity occupied by temporary files and quickly delete them in one go. I hope the above methods work well and you quickly remove all temporary files. It must be noted that along with these temporary files, many duplicate files and cache files are associated with the apps you are using. They are more dangerous when compared to temporary files in terms of consuming memory. These cache files are not easy to remove as you have done in removing temporary files. Deleting all the cache memory (hidden memory) is highly recommended. For this, the best method is to use utility software, although we have previously discussed the manual method to remove all the junk files.
Method 6: Clean out Junk, Cache, and Temporary Files using Utility Software
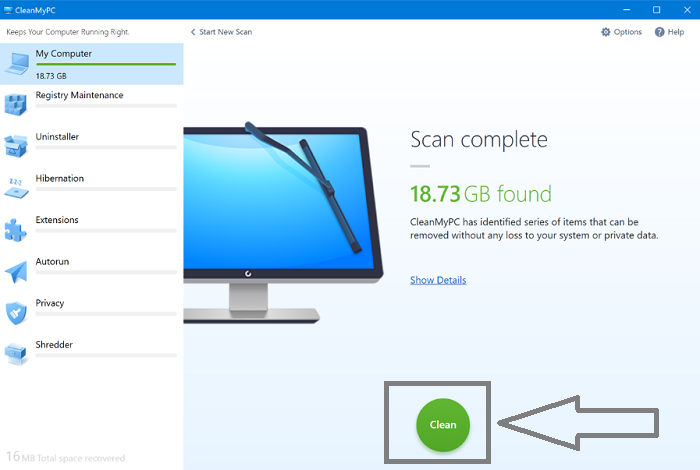
On my list, which I have been using for the last 6 months, is CleanMyPC by MacPaw. A fantastic tool that works fantastically; if you have this, you can easily clean up all the unnecessary files in one go. The feature I like the most about MacPaw CleanMyPC is that it intelligently deletes unnecessary files. During my first scan, I deleted about 15 GB. If you are ready to spend a few bucks, I recommend using this software as it saves time and works automatically. Let us check how this software works.
CleanMyPC Discount 2019 (72% Off)
Grab Discount Now on CleanMyPC >>
(Use 4EDUCATION Coupon Code)
- Download MacPaw CleanMyPC, and after successful installation, launch this.
- On the very first screen on the left side, you will see various options; click on the Scan button.
- Hold on for a moment till the process is completed; once the process is completed, the screen will display the number of unnecessary files extracted. As previously discussed, all the extracted files are smartly scanned.
- Click the “Clean“ button to clean out all the junk and cache memory to free up your PC space.
This is the simplest method of all and cleans up all the unnecessary files, which are almost impossible to find manually.
Comments
You may have noticed other hidden files such as junk and cache if you have read this complete tutorial. You may not have been aware of this earlier, but you should remove them too to speed up your PC and clean up space. If you are only going to remove the temporary files, then the above methods work well, but the manual method does not work for all other hidden files. Utility software is highly recommended for this. CleanMyPC is a great tool. CleanMyPC has many more features that accelerate your PC’s performance, improve computer startup, and many other things. You must read the MacPaw CleanMyPC review.
You may also like:
- 7 quick tips to speed up USB data transfer
- 2 best ways to restore accidentally deleted files on Windows 10
- How to sync computer automatically using Google Drive & Google Photos?
I hope you find this tutorial on 6 Best Ways to Delete Temporary Files on Windows 10 helpful PC and successfully remove all temp files. For more tech tutorials, the latest deals, and online security tutorials, follow us on Facebook and Twitter.