Editing a video perfectly is as essential as shooting it. And this is what my YouTuber friend told me! And I agree with this as well.
I recently started shooting some videos for YouTube, but after a few days, I had a good amount of unedited content.
And there I was, clueless about which software I should opt for to get my work edited and up for my viewers.
Movavi Video Editor Review
The foremost important thing here was getting it done quickly and easily. Because, to be accurate, I am not a pro at video editing.
Although I have used a few software in the past and know most of the basics, I still didn’t find any of them working the best for me.
So this time I chose to go with my friend’s choice and that is Movavi Video Editor Plus. And that was because of the flawless video content she posts.
Therefore in this article, I will share my complete experience and review of Movavi Video Editor Plus. I have been using Movavi for quite some time now and here I will share what I found the most useful and what I didn’t find to work for me.
But before moving ahead, you can look at “Top Video Repair Software for Mac and Windows PC.” This works great in case your files have been corrupted, and you want to retrieve them quickly. Because losing valuable data is just what we don’t want. Right?
Is Movavi Video Editor Plus a Good Idea?
Movavi Video Editor Plus is a powerful yet very simple software that helps users to create incredible videos in no time.
The history of Movavi dates back to 2004, when the company was first established. Since then, the company has been dedicated to creating the best tools and has provided its services to over 300,000 users.
So here in this review, I have listed the compatibility and system requirements, pricing, download, installation process, features, and our opinion at the end.
Compatibility
Movavi Video Editor Plus is available for both Windows and Mac computers. Moreover, the interface is available in 14 different languages. Below are all the details related to operating system specifications, file size, device compatibility, etc for both Mac and Windows computers.
For Mac
The operating system required to run the software flawlessly is Mac OS X 10.10 or higher. When the software is downloaded and installed, it takes up to 256 MB of RAM on your Mac.
The processor compatible with the software is a 64-bit Intel processor. And the file size to be downloaded on Mac is 95.7 MB. These are the few basic requirements your computer has to fulfill to run the software.
For Windows
The operating system required for Windows is Microsoft Windows 7/8/10 or higher. And for Windows, the software is of 62.0 MB file size to be downloaded on the system. When installed, it takes up to 2 GB RAM. And an Intel, AMD, or compatible dual-core processor, 1.5 GHz, is also required. These are some of the requirements that the device has to fulfill.
Download and Installation
In the next step, after checking out your system’s compatibility with Movavi Video Editor Plus, you can move ahead to download and install the system.
It took me just a few minutes to download and install the software on my Mac computer. The complete process was simple and easy. The first thing is to purchase the software and download it on your computer.
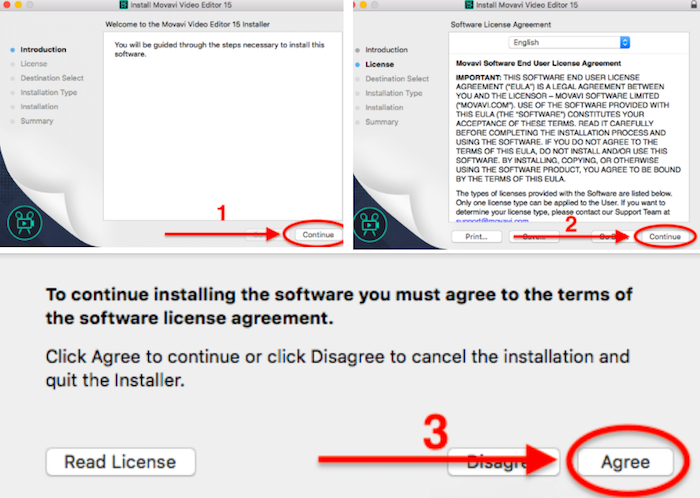
Then the installation takes you through the 6 simple steps to allow the software to run on your Mac. In the first 3 steps, you must simply read all the policy and license agreements and then click on continue and agree to the policies.
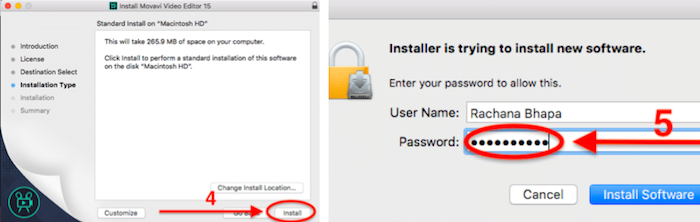
The next step is followed by clicking on Install and entering your password to allow the software to install on your device.
And that is it. It is that simple. Don’t you agree?
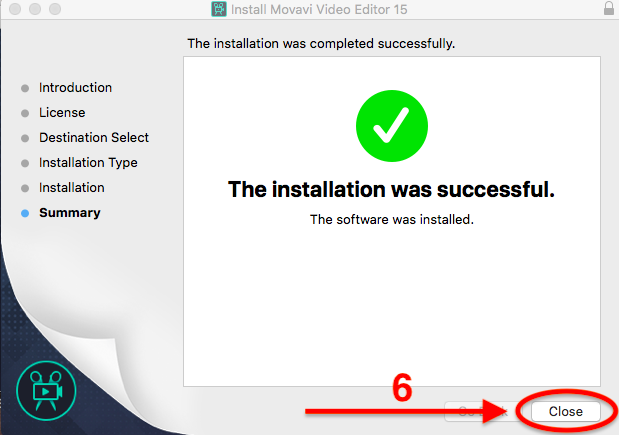
The installation process is complete in a few seconds, and you can move ahead and close the window and start running the software immediately.
Pricing
Movavi Video Editor Plus offers both free and premium plans, which are described below. In the free version, the user is limited to a few basic features and cannot test all the features available on Movavi.
But it is a great way to check how this software works. Whereas in the premium version, the users get lifetime access to all the features available on Movavi Video Editor Plus.
Movavi Video Editor
| For Windows | For Mac |
| Personal license | Personal license |
| Business license | Business license |
Movavi Video Editor Plus
| For Windows | For Mac |
| Personal license | Personal license |
| Business license | Business license |
When the user has purchased the paid program, they will receive an activation key in their email within a few minutes after purchase. With that, the user can easily download and activate the software from the website.
Moreover, all the payments are made through a secure payment gateway so that all the user’s information remains secure and private.
And adding to this, if the user encounters any issue with downloading or activating the software, they contact the Payment support team, which is available 24*7 and is a call away.
The contact numbers are given on the official website.
Free Version
Mac and Windows users can download the free version of the software from the official website. It takes only a few minutes to download and install it on your computer.
The installation is rapid and easy. But if you are looking for serious work, we highly recommend using the paid version.
This free version is only limited to 7 days. And also, the number of tracks you can edit on the timeline is very limited in the free version.
After you complete a project using the free version, your project will include a watermark too.
Paid Version
The paid version is available for $59.95 only (we are running special promotions for our readers). With this, the user gets lifetime access to all the features of Movavi Video Editor Plus.
The user has complete access to all essential features in the free version as well as additional useful features such as quick processing for 4K videos, Animation, Extended Media Pack, Timeline markers, effects, transitions, and a lot more.
Features
Here I will discuss all the features and how Movavi works in detail. Because when it comes to choosing new software, in my case, I prefer to dig deeper to see what it offers and does it stands by its claims.
So let us start from scratch!
1. Quick Video Mode
When you have installed the Movavi Video Editor Plus, the next thing to do is open it. So the first thing you see when you open the program is a window with two different options.
The first one is “Quick Video Mode,” and the second one is “New Project Mode,” which we have discussed below.
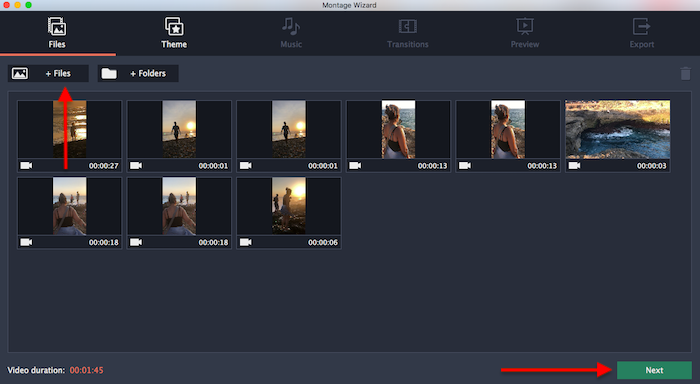
The “Quick Video Mode” helps the user to create a quick video in just 5 steps. All you need to do is first just choose the Quick Video option; you will be directed to a blank screen with the “Files” Tab on the top. You can choose the Flies or Folders you want to add to the video. Then just click on “Next.”
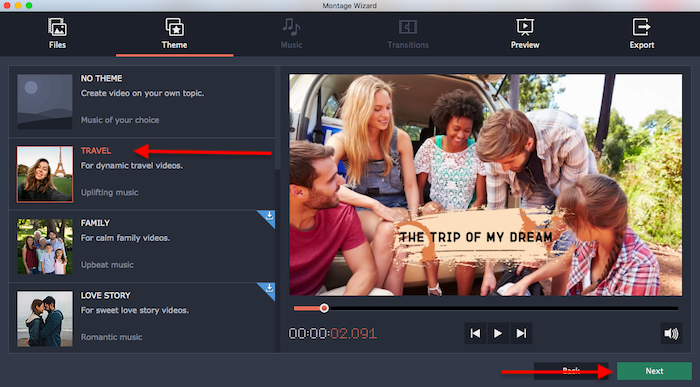
Now you will be directed to the “Theme.” Download any of the themes available on the list or choose “No Theme” to create a video of your own choice. Here I choose the “Travel” theme to start. And then click on “Next.”
Next comes the “Preview.” Click on the play option to run the video. What I found unique about the Quick mode is that it arranges the video and clips automatically and creates a video itself.
This is great if you just want to surprise someone quickly by creating a quick video in seconds.
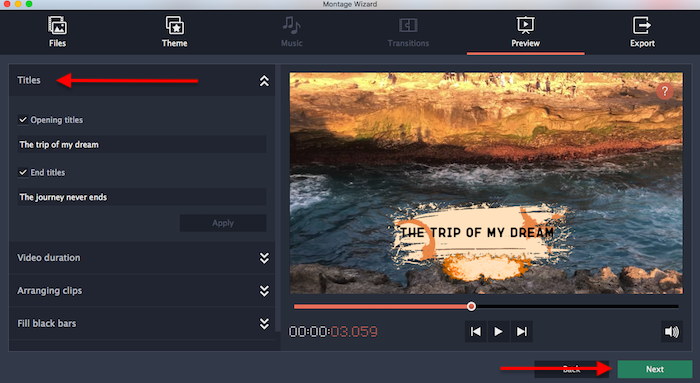
Another cool thing about this is that in the Preview Mode, you can edit the “Title” from the left side. You can also edit the video duration and make it longer or shorter according to your choice.
If you feel a clip is not in the correct sequence, you can change it too by rearranging it. And there is another feature listed below for Arranging clips which are “Fill Black Bars.” Using this, you can automatically make the clips fit the frame.
And in the end comes the Volume Balance. So using this feature, if you have background sound and a theme song, you can adjust how much you want to mix so that the video sounds good. And that’s it. Again click on “Next” to continue.
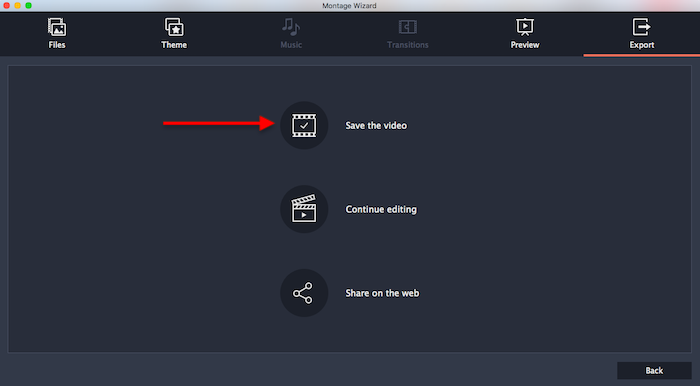
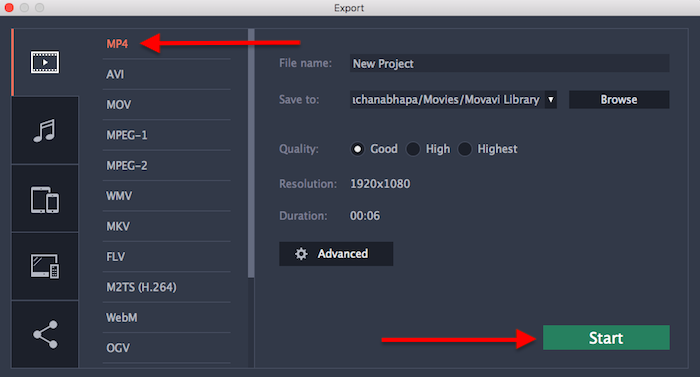
The final step is to “Export” the video. The window automatically opens and you just have to choose “Save the video.” Then you must select which format you want the video to be in.
There are several formats listed on the left side of the window. Choose one from them. Also, check the file name, size, and quality in which you want to export it. And that’s it.
Your video is ready to run. It wasn’t that easy! When I first used it, I couldn’t believe how quickly I created a short video without needing to read manuals and try to find the simplest of features. This is the thing I found the best about Movavi Video Editor Plus. Despite it being professional software, it is so easy to use. So if a beginner is giving it a try, in a few minutes after using it, you feel like you can create a beautiful video without any difficulties. And this thing is hard to find in other video editing software.
So this was just about how the Quick Video Mode works. Let’s see how the “New Project Mode” is in store. Because, to be honest, you are using the “New Project Mode” all the time for serious video editing.
2. New Project Mode
Now, if you do not want Movavi to create a video clip automatically for you, you can choose to create one yourself.
As we already saw, the Quick Video Mode is limited to using tools; here, in the New Project mode, you get complete access to all the features that Movavi offers.
And creating a New Project is as simple as creating a Quick Video. When you launch Movavi Video Editor Plus, you just need to click on “New Project.”

A new window will open and be ready for you to start creating a new video. Whenever you create a new project, it is saved in the program, and you can always access it when you launch the software the next time. All the saved projects are visible on the first screen under “Open Project.”
I have listed all the features and how to use them below.
3. Add Files
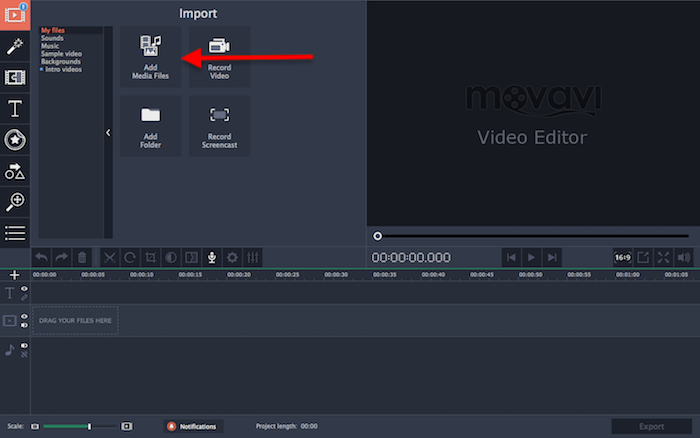
After opening a new project, the first thing to do is import Media Files. The first feature on the editing window’s top left corner is “Import.”
The Import feature has another sub-menu with files, sounds, music, sample video, backgrounds, and intro video options. The “File” feature offers you to “Add Media Files” or “Add Folder” to your project.
Expect all other options to offer “Free Built-in content” to use.
It is quick and simple to locate it and move ahead to choose files to import. Now you just need to locate your files and add them to the media library.
They will automatically appear in the Timeline at the window’s bottom. All the files will appear in the order you have selected them or as they were on the folder.
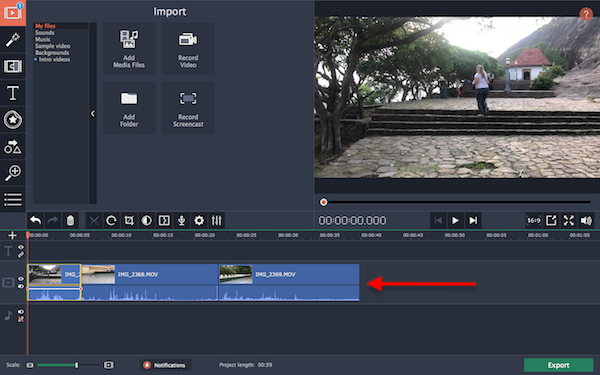
After the Import is complete which takes just a few seconds and is very quick, you can also see a preview of the files on the small window above the timeline.
You can click on each click and see a preview of it above. That is how you can further make edits and check them alongside quickly.
And if any click is not in the position you want it to be, you simply have to drag it and drop it where you want it to be. There is nothing complicated about it.
4. Preview
Preview plays a vital role in video editing. Because whenever you are editing, it is very essential to see in real-time how it looks when you play it.
Therefore the preview window helps with it.
Let’s check out other features included in the Preview window.
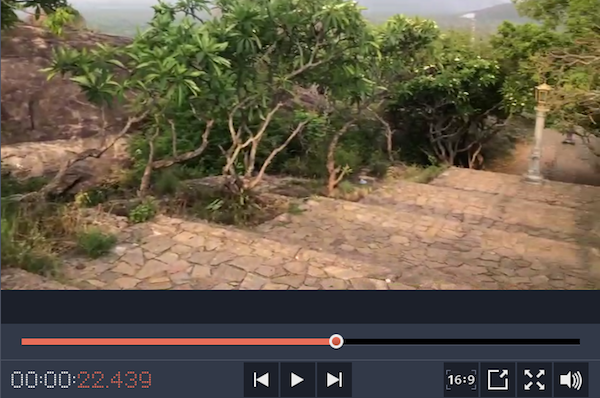
The first thing is the position marker. The marker helps you to move the video back and forth. You have only to drag it or tap it from where you want to watch it.
Under the screen, you can see the “Timer.” It shows the timing of the video playing. Then comes the “Backward,” “Play,” and “Forward” options. The next thing is the “Aspect Ratio.” You can change it according to your need. If you want a square video, you can select 1:1 from this option. Next is the Unpin option and then “Full Screen,” and then “Player Volume.”
All the features are easy to use and help you to get a clear idea of how your final video will look.
5. Basic Features
Above the Timeline are a handful of features to give you quick access to frequently used options. Let’s check them out. You can also use keyboard shortcuts to use these options as well.
- Undo. If you want to undo any changes made on your project, you can use Undo option, which is the very first located above the timeline.
- Redo. Just opposite to the Undo option, if you have canceled anything and want to return it, you can use the Redo option to do so.
- Delete. If you do not want any clip to be a part of the project, you can simply click on it and then choose the “Delete” option. This option is represented by Trash on the screen.
- Split. The scissors icon represents “Spit.” This is used when you want to split a clip into two portions. You can use it for both audio and video clips.
- Rotate. If you have shot any video vertically instead of horizontally, you can use the rotate option to correct it.
- Crop. Sometimes when we record a video from far, we have unwanted items included in the video. You can use the Crop option to trim the corners to get rid of them.
- Colour Adjustments. With this option, you can fix the image’s saturation, contrast, and white balance. You can choose Auto Adjustments to automatically fix the color or the manual adjustments to work on each factor independently.
- Clip Properties. Next comes the clip properties. This is a more advanced feature and helps you get in control of your video clip completely. Just click on the clip and then choose “Clip Properties.” Several tools will appear, such as Volume, normalize, speed, reverse, opacity, duration, fade-in, and fade-out. You can edit the properties as per your requirement.
These are just the fundamental features that most video editing software includes.
6. Overlay Effect
Overlay or “Picture in Picture” is an effect that is added to the video to include two different clips in one video. There are different ways how we can use it.
In the first case, both videos can be seen on the same screen. Both occupy the same space. In the second case on video can be seen overlaying the second video and only appear as a small part of the video. It is also used if you want to add a logo or watermark to the video.
Let’s see how it’s done.
The most important thing is that both the video clips and images should be available on the timeline. Now click on the click you want to overlay on the other and drag and drop it on the top of the other clip.
Then go ahead and double-click on the overlay clip. On the Preview, you will see options related to the overlay clip.
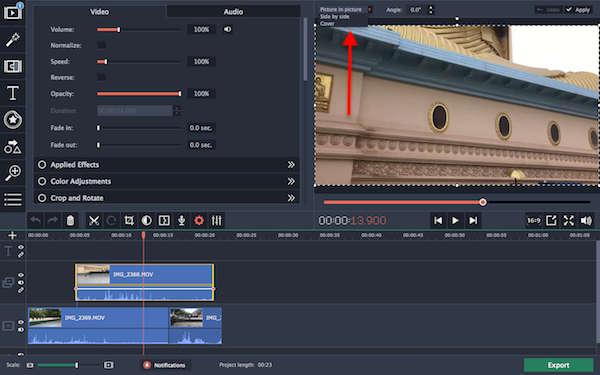
Three options will be displayed. Picture in Picture, Side by Side, and Cover. Select the one you want and then click on Apply. All the changes will be applied.
7. Freeze Frames
Another great feature that Movavi Video Editor Plus offers is Freeze Frame. This means that in the middle of the video running you simply freeze a frame to explain something.
Want to check out how it happens? Keep reading!
Choose the clip you want to add the freeze-frame to. Then position the market precisely to the moment you want to free the frame.
Right-click on the position and choose “Insert Freeze frame” from the options.
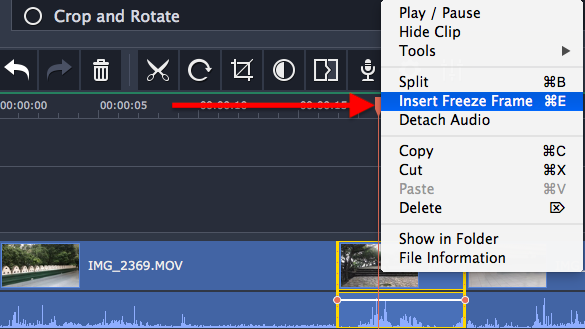
The default settings set the freeze-frame to 4 seconds. In case you want to increase the time duration, you can simply drag the side of the clip to increase the duration.
8. Audio Editing
We have covered most part of the video editing now; let’s check out how to edit audio and soundtracks. Audio editing may seem difficult, but believe me, it is straightforward and easy too. You just have to make use of the fantastic features that Movavi Video Editor Plus has to offer.
First, locate and import the audio using the “Add Media Files” option. You can also check out the built-in music offered by Movavi.
As soon as you have added the file, it will appear below the video clips on the timeline. You can drag and rearrange where you want your audio file to be.
To make edits to the audio, click on the audio file and click on “Audio Properties” just above the timeline.
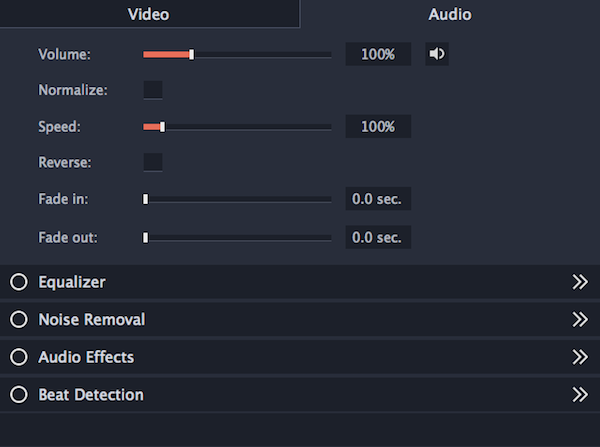
As you can see, all the basic and advanced features are listed above.
You can adjust the volume of the audio file by dragging the Volume option, and you can also change the speed of the audio track here. If you want the audio to fade in and out, you can also choose the duration from audio properties.
Other than this, if you want to remove some unwanted noise, you can use Noise Removal to automatically remove noise. You can also add audio effects and use Equilizer for the audio.
9. Filters
Under the Import option on the top left corner of the window, you will find “Filters.”
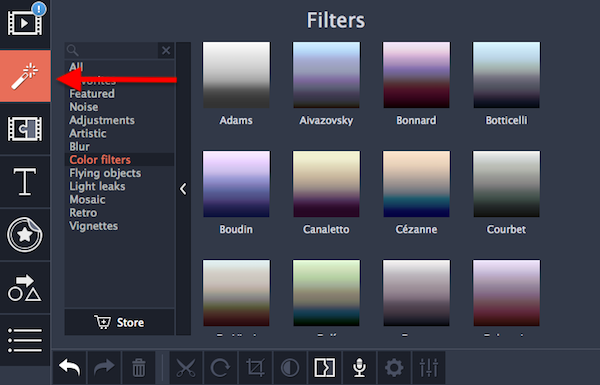
Many Filters are available in the Movavi Video Editor Plus gallery. Such as Artistic filters, Blur filters, color filters, flying objects, Retro, Vignettes, and many more. You can go through the complete gallery and select what you want to add to your video.
You can also click on the filter to see a preview of it so that you know how it will eventually turn out.
To add a filter to your project you have to follow a few simple steps. First, you have to select the filter from the filter gallery. Then decide where you want it to be on your video.
Drag and drop the filter above the video clip location you want it to be. And the filter has been added.
10. Transitions
Just like Filters, Movavi has a gush gallery that offers excellent transitions. Transitions are used to join two clips and add effect in the middle of the clips. Below the Filters option, you can find “Transitions.”
Choose the transition you want to add to your clips and drag and drop it in between two clips. You can edit the length of the transition and also its properties easily.
11. Titles and Stickers
After Transitions comes Titles. I am sure you must have noticed texts at the start, middle, or end of the videos. The text may add meaning or be used as subtitles on the video.
Movavi Video Editor Plus has the Titles feature so that you can easily add different types of texts to your videos by choosing from the wide range of titles available.
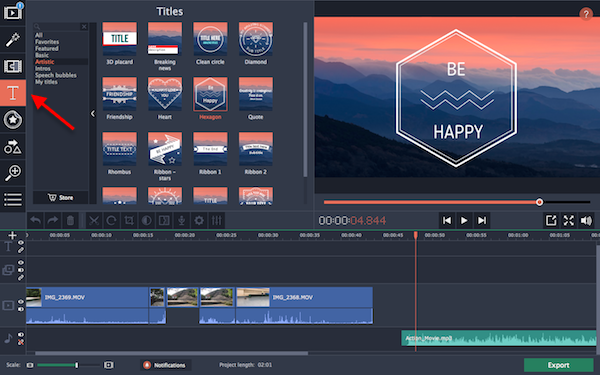
Simply choose the Title you want to add and then Drag and drop it on the video clip. Once it is placed on the video clip it will be played as the default clip. Double click on the Title to edit it and add text of your choice to it.
You can easily change the size of the text, color, style, and alignment of the text from the Title Clip properties.
In the same way, you can also add Stickers to the video. The stickers option is located below Titles. You can choose a sticker of your choice and place it over the video and edit it from there.
12. Other Features
Here I have listed some of the features you can use to enhance your Video quality.
Callouts. These are Sketches, Signs, shapes, Highlighting, Arrows, etc., used to point out something in a video. You have to drag and drop them on the video clip simply. Then you can edit them by moving or modifying them.
Stabilizing Video. If you have recorded a video that shows a shaky image, then you can make use of the Stabilizing feature to fix this issue. First, you have to click on the clip you want to correct, and then, from the left menu, choose Stabilizing option. Further click on “Stabilize” to start the process. You can adjust the parameters such as accuracy, shaking, radius, etc.
Why Should you Choose Movavi Video Editor Plus?
So when there is so much competition and new companies emerging in the video editing field, and everyone claims to be better than others, then why should you choose Movavi? That is the first question that comes to our mind.
Our Experience
The first reason is that Movavi is easy to work with. All the user needs features and tools are easy to find and use. A straightforward interface is one of the most essential things in video editing. And you get it in this software.
The following reason is that it is compatible with my devices, whether I use a Mac or Windows. I can work on any system with this software. And then, it does not take hours to wait to process every file. It is quick and saves me time. And it is a powerful software when it comes to large files and their processing.
I don’t want to make it complicated. That is why I have listed the simple things that matter to every user. Other than this, you can check out all the features that I have listed above in detail to make your choice easy.
I hope this review on the Movavi Video Editor Plus was informative for you!
Let me know in the comment section below what is your personal choice when it comes to video editing software and has you tried and tested Movavi Video Editor Plus yet.
You can also subscribe to our newsletter to stay updated on the latest information we post.
You may also Like: