You may enhance your online anonymity, safety, and surfing performance by modifying your computer’s basic DNS settings.
If you’re a parent, updating your DNS server may help prevent your kids from accessing any potentially harmful information.
Furthermore, resetting your DNS will enable you to access otherwise unavailable information in your country.
When you sign up with an internet service provider (ISP), you are assigned to one of their DNS servers.
This feature allows you to visit your favorite websites and activities without keying in their IP addresses manually. Regrettably, not every DNS server is alike.
Related – How to fix WiFi connected but no internet speed?
There are a variety of reasons why you may desire to try and change DNS in Windows 10, but you must first understand what they are and how they operate before making a choice.
How to Change DNS Settings on Windows 10
What exactly is DNS?
DNS stands for Domain Name System.
“Domain” refers to the URLs you input in your browser, while DNS stands for Domain Name System. The majority of us take them for granted—we put in the web site’s name, bringing us to the desired location. So, what is DNS stand for, and why do we need to have one?
However, a Domain Name System server works behind the scenes to convert the URL you input into an IP address that your computer can recognize.
The sooner this procedure is completed, the shorter your delay and the quicker your browser can retrieve content for you.
On a Windows 10 computer, how do you change the DNS server?
- Launch the Start Menu in Windows. To do so, go to the underside corner of your display and press the Windows logo.
- Then go to the Settings section. Just over the power button, there’s a gear-shaped symbol.
- Choose Network & Internet from the drop-down menu that appears.
- After that, choose Change adapter settings from the drop-down menu. Under “Advanced network options,” you’ll find this.
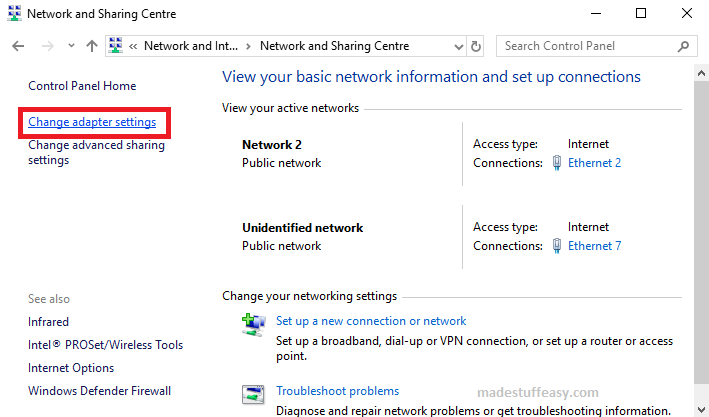
- Configure the DNS server for the connection by right-clicking it. Select WiFi if you’re connected. Select Ethernet if your connection is through Ethernet. You’ll be able to tell which connections you’re utilizing since they have green bars, and those that don’t are marked with a red X.
- Select Properties after that. In the pop-up menu, this will be the last choice.
- Select TCP/IP Version 4 (TCP/IPv4) as the next option. If you don’t see this option, use your mouse to navigate up and down the list.
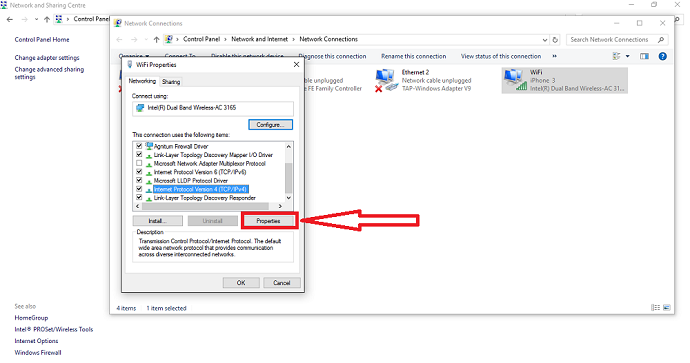
- After that, go to the Properties tab.
- Then, next to the radius, click the plus sign. The DNS server addresses are as follows: The bottom side of the window will reveal this.
- Insert a new DNS address after that. You should also provide a backup DNS server address in the following line.
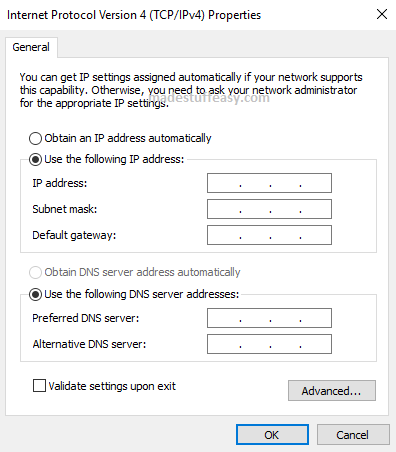
- Click OK to finish. Unless you click OK, your changes will not take effect.
Change DNS settings in Windows 10 via the Settings app.
Follow these procedures to modify your DNS addresses in the Settings app:
- Go to the Options menu.
- Select Network & Internet from the drop-down menu that appears.
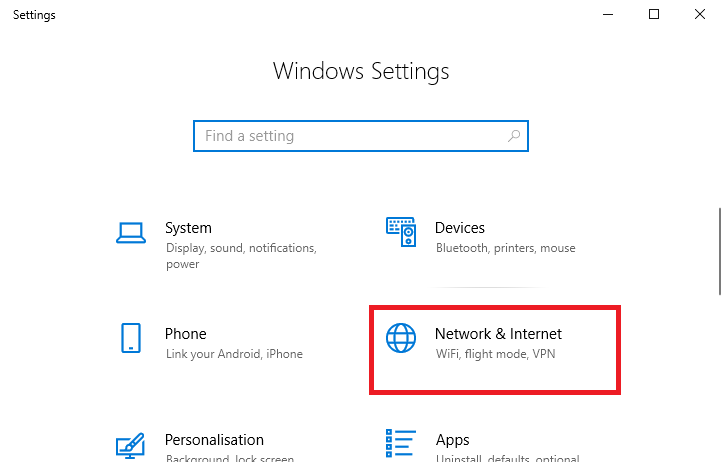
- Ethernet is selected (or WiFi depending on your connection).
- Choose the network connection for Windows 10.
- Click the Edit button under the “IP settings” heading.
- Choose the Manual option from the “Edit IP settings” drop-down menu.
- The IPv4 toggle button should be turned on.
- Verify the addresses for your “Preferred DNS” and “Alternate DNS.”
- Save the file.
Once you’ve completed the instructions, you should now be enabled to access the internet by using new domain registrars.
Although using the Settings app to modify your computer’s DNS settings should be the preferred method, we don’t advocate it since it might be confusing for specific users.
Using the Command Prompt, Change DNS Servers
Using Command Prompt, you may change the chosen DNS server on Windows. If you’re familiar with using the command line, this is the approach to use.
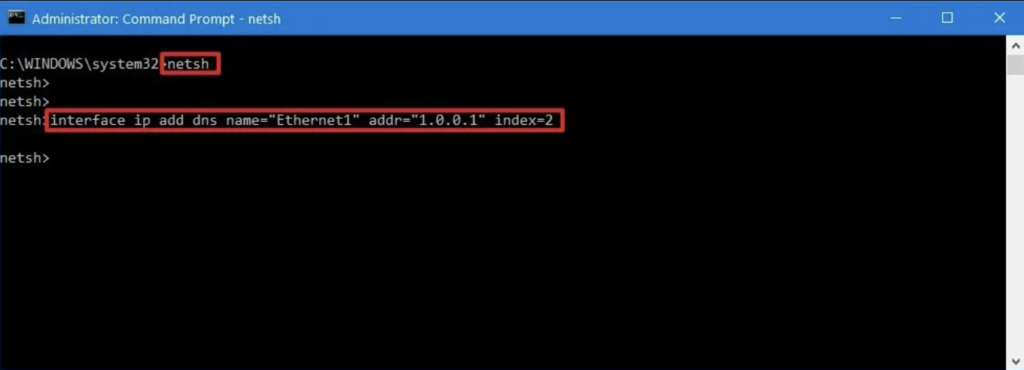
- Start a Command Prompt with elevated privileges.
- Hit Enter after typing netsh.
- Type interface ip display config and press Enter at the netsh> prompt.
- Find the network connection where you wish to modify the DNS server.
- Press Enter to enter the command interface ip set dns “Ethernet0” static 8.8.8.8. Replace Ethernet0 with your connection’s name and 8.8.8.8 with the DNS server you wish to use.
- The netsh> prompt appears once the command is finished.
- Command Prompt must be closed before continuing.
Which DNS Server Can You Use If You’re Using a Third-Party DNS Provider?
Cloudflare, Google Public DNS, and OpenDNS are excellent choices if you wish to utilize a third-party DNS server. You may use each of these service providers’ primary and secondary DNS addresses.
Because it is so simple to remember, Google’s Public DNS address is one of the most popular. It’s worth noting, however, that Google keeps track of the IP addresses that access its servers for one to two days to aid in diagnostics and troubleshooting.
Although Google assures that no personal information is stored, there may be some long-term records. If privacy is important to you, you should use a different DNS address.
Due to the apparent speed and anonymity it provides, Cloudflare is also a desirable suggestion. Cloudflare guarantees that your data will not be used, or your IP address will not be recorded.
A 24-hour deletion procedure is also in place, with data being deleted every day. Cloudflare also maintains an active community forum where you may ask questions regarding the company’s services.
If you want a seasoned DNS provider, OpenDNS is a good option. It filters phishing sites by default, and its website allows you to set up parental controls for free.
OpenDNS also provides commercial services with many additional benefits, including access to up to a year’s worth of your internet usage history.
We hope this tutorial helps you in changing the DNS address successfully. For the latest tech tutorial and software deals, you can follow us on Facebook Twitter.