In this tutorial, you will see how to create a mail merge using Gmail in spreadsheets.
Although there are many other possible ways to create a mail merge using Gmail, here you will see the best and easiest way to complete a mail merge which I prefer.
Using mail merge now becomes essential, especially to those running significant companies and several people connected to them.

What is Mail Merge?
Before we begin, let us know what mail merge precisely is?
Let us consider an example suppose if a school teacher has to give assignments to the students, he can manage to send the same email to everyone without sending them individually using mail merge.
Or, if a company wants to send the information to their employees, he manages to email everyone with mail merge.
Must Read: What is Phishing and how to protect against Phishing threats?
How To Do Mail Merge in Gmail With Excel
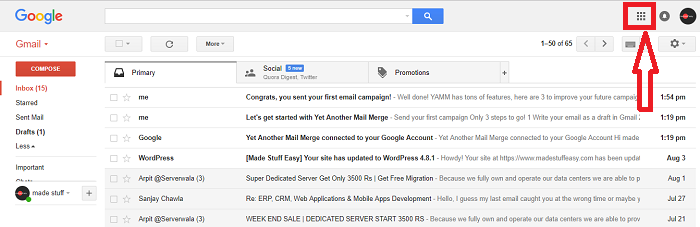
STEP 1: Open your Gmail account and Sign in with your login credentials. Now Tap on the Google apps icon on the top right side of your screen (see below the screenshot if unable to identify).
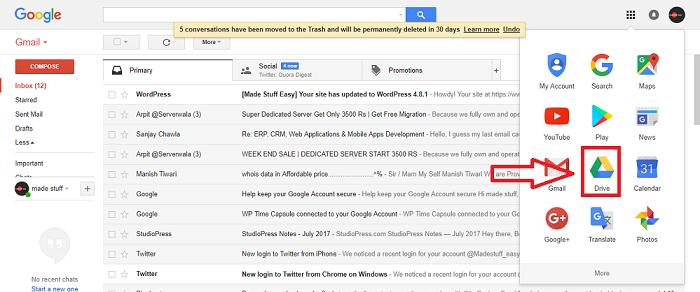
STEP 2: Now select Drive app from the drop-down apps list. You can also choose Docs in more apps options (but we use spreadsheets to create mail merge).
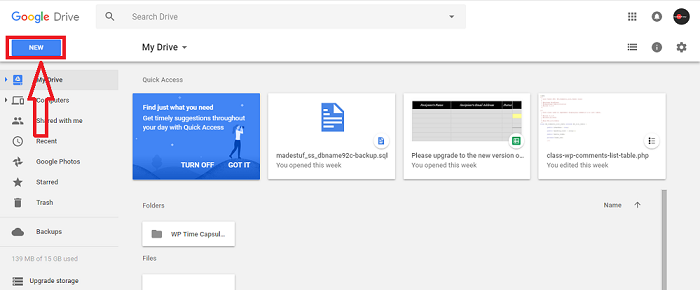
STEP 3: After Spreadsheet opens, tap NEW, Change its name (here I have renamed it as My Mail Merge), you can choose according to you.
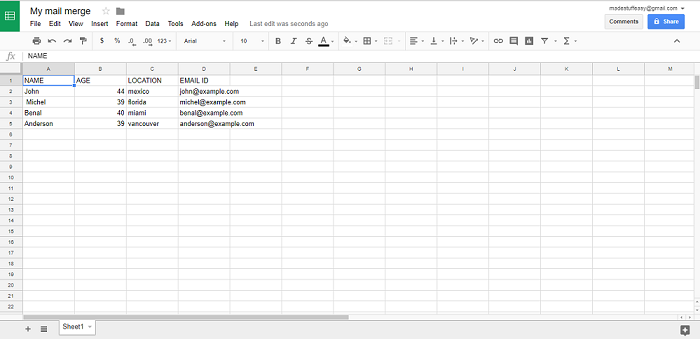
STEP 4: Now, write down the details you want to list in a spreadsheet. I have marked it like Name, Age, Place, Email Address. You can write according to your criteria. See STEP 5 if you want automatically to attach names, addresses, and other details you have in your Google Account.
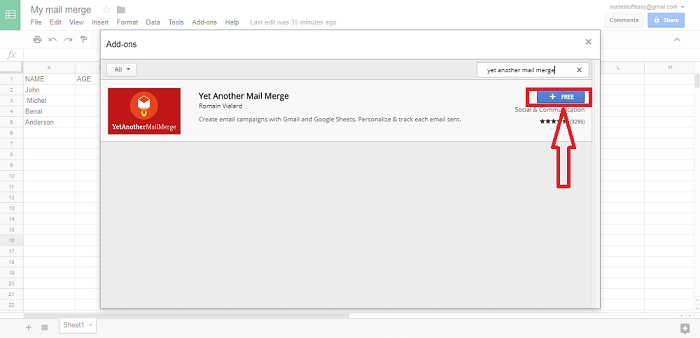
STEP 5: Now tap over to Add-ons> Get Add-ons. Now search for new add-ons Yet Another Mail Merge. This add-on is free of cost and easy to use.
By using Yet Another Mail Merge, you can automatically add names, contact, and email address you already have in your Google Contacts.
STEP 6: Now go back to the Gmail account you have logged in to (in step 1). Now create a new Draft there and save it.
If you want to send an email with specific names or addresses to a particular individual, you must write as $%name/location%.
If you cannot understand this, you must see the below screenshot to make it clear.
Save this draft. Please leave it blank. Do not write anything in the field of Recipients.
Must see: How to create Gmail signature

STEP 7: Then again, go to the Spreadsheet you have created and navigate to Add-ons> Yet Another Mail Merge> Start Mail Merge. Click continue if the option displays.
NOTE: If you use the free version, you can send mail to 50 Recipients only. You can buy a package, or one free option is to invite your friends to exceed your daily limit of sending emails.
For this, a Dialogue box will appear; otherwise, select continue for the next step.
STEP 8: Now, a dialogue box will appear (as shown below screenshot); you can edit Senders Name (Your Name) and select Email Template as the subject you have written in Saved Draft earlier in STEP 6 ( I have written Hi $%NAME%). Now tap Send 4 Mail (I have four email addresses).

STEP 9: Your email was successfully sent to the address you provided, but still, you can send an email to 46 other members as a total free quota limit of up to 50 Emails a day.
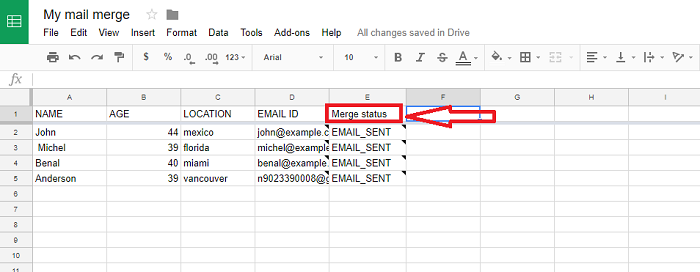
It will show you Merge Status in the next column of your detail once you send emails.
After following these steps, you can easily create a mail merge. Let us show you how it appears to the receiver, the email you have sent.
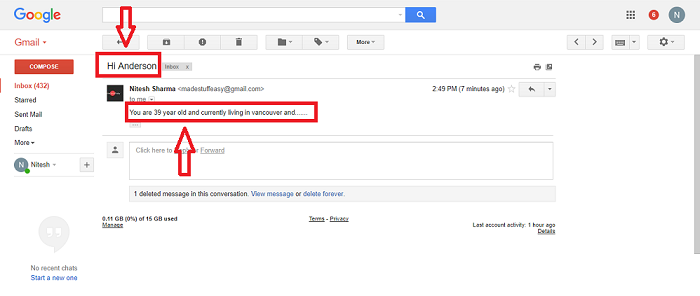
Check out the name, age, and place automatically appear by using the text as discussed in STEP 8. You need not write the individual title as it consumes your time.
Comments
No Doubt Mail Merge with Gmail is the best option. You can have a daily limit of 50 Recipients, but if you want to exceed this limit, you have to buy plans according to your need or daily email usage.
You may also like:
- How to sync desktop PC with Google Drive and Google Photo
- How to download Google Maps offline navigation on iPhone and Android
I hope you like this tutorial about Creating a Mail Merge using spreadsheets. Please share it with your friends to access mail merge easily with a few simple steps.
Keep in touch with us for more helpful information on social media, Facebook, Twitter.