Transferring files to/from Mac using Airdrop seems to be the easiest and the best way. But there might be an issue with your Airdrop not working on your MacBook. This post is made by keeping in mind after facing a similar problem with me. I searched for various factors online to fix this issue but didn’t get a solution. After deep research, we found the solution, which was effortless. Might you have a different case but here we will discuss all the major factors responsible for this issue.
Airdrop works on iOS & macOS and is considered the best way. It makes transferring heavy files in significantly less time and keeps the quality of transfer data, whether it is a picture, video, or any other. This is the reason why Airdrop is the most popular. But you must note Airdrop only works on apple products.
How to Use Airdrop?
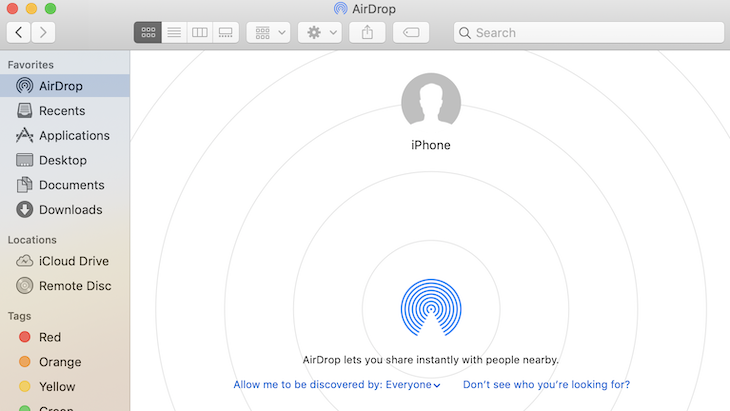
Before going to actual fixes, please look at how to use Airdrop on your Macbook. There might be a possibility that you are using it the wrong way. Here we have made the best way to make sure you are using Airdrop in the right way. You will find the Airdrop in Finder and check the nearby available airdrop devices.
- Open the Airdrop from Finders and locate the device you have to send. (Make sure receiver has enabled discovered to everyone).
- Now go to the files/docs/pictures/videos you want to share via Airdrop. Select them and Drag them to the available Airdrop device.
- Accept the files in the receiver device, and you can have the files there!
This is not the only way to share files via Airdrop, but this is the easiest way you can go for. Otherwise, if you cannot locate the device on Airdrop, continue reading this post, and you will solve this problem.
How to Fix: Airdrop Not Working on MacBook
Many factors bring this issue. Let us consider them one by one. If you have already done with the following element, then skip that and check next.
1. Make your Airdrop Discoverable
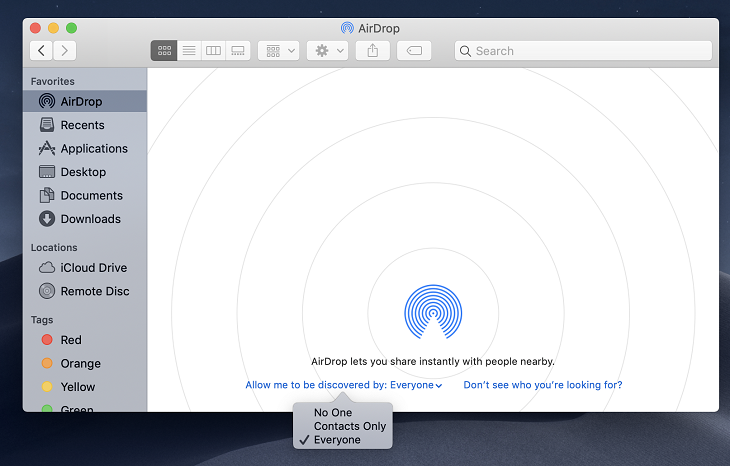
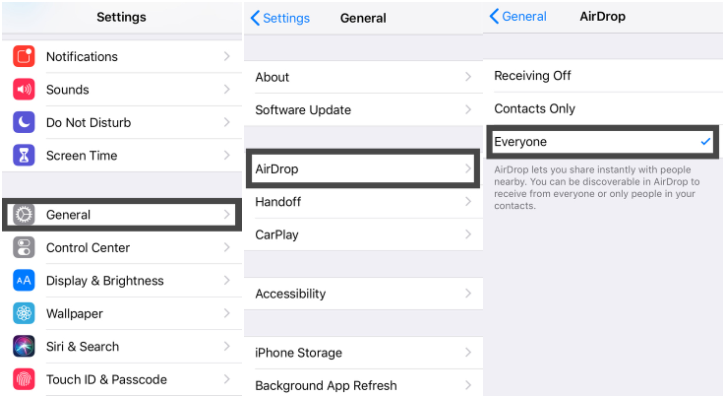
When you start sharing files, ensure the receiver device’s Airdrop is discoverable. In Airdrop, you will see three options:
- Receiving Off: By default, this is activated, meaning your Airdrop is not seen on any nearby device. Once you are done with sharing, you have to select this option.
- Contacts Only: You can only select this option to share/ receive files from contacts. This might be your phonebook contacts, iCloud contacts, or email contacts (for iCloud and email contacts, you must be logged in already to access).
- Everyone: This option receives files from all the contacts, whether it is in your communication or someone else. You must enable this option if you are unsure whether the person is in your phonebook.
This option is easily opened on your MacBook. Navigate to Finder, and under Favourite, choose Airdrop. Click on the Allow me to discover by and select your option.
On the other hand, if you are enabling it on your iPhone, go to Settings> General> Airdrop and select your option.
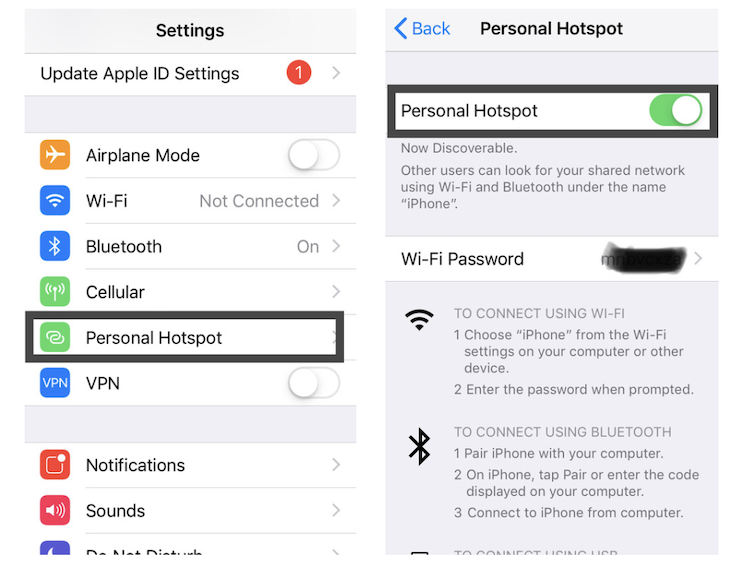
2. Hotspot Disabled
This is the reason in most of the cases by which your Airdrop is not working. Ensure your hotspot is turned off when connecting your device to Airdrop. Hotspot must be disabled on both receiver and sender device otherwise; it is not discoverable to the network. To turn Off the hotspot, navigate to Settings> Personal Hotspot and then turn it Off.
3. Both wifi and Bluetooth are turned ON
Airdrop does not work if either of both is turned off. Bluetooth locates your device, which is nearby and wifi helps in transferring data. So you must keep both wifi and Bluetooth turned ON for both receivers and sending devices.
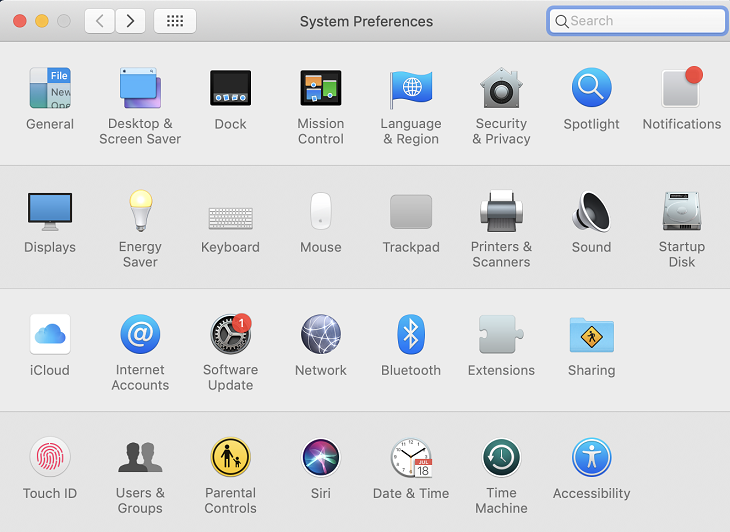
To turn on Bluetooth and wifi on Mac, navigate to the Apple icon () on the top left of your screen, click System Preferences, and then Bluetooth and Network. Here you can turn them ON.
Most Probably, both wifi and Bluetooth automatically turn ON once you turn ON Airdrop. If still not enabled, you can turn it ON by the above option. And in case you are using iPhone, then simply swipe up the home screen and turn ON Bluetooth and wifi.
4. The issue with IP Address
As discussed in the first paragraph. I use VPN (Virtual Private Network) on both MacBook and iPhone, and probably wifi fails to locate the nearby airdrop device. This problem I faced during the transfer of files was due to the change in IP address.
Recommended: What is VPN, and how VPN works to protect your privacy?
VPN is recommended software to protect your data and privacy if you use public wifi. VPNs hide your original IP address and make your connection invisible. This is the reason the wifi is unable to locate the nearest wifi. If you are using VPN, ensure this is Off on both the receiver and sender device.
5. Multiple Files transfer failure
Mainly we select multiple files to transfer in one go, and the problem arises, or the transfer is stuck in between. Try to transfer limited files simultaneously (although there is no limitation) to work smoothly. When the apple device receives any files via Airdrop, there is an option to open them. This issue might happen if all the files are not in the same format. If you have a diverse collection of files with apps, pictures, and videos, send the same format file first. This may fix your problem.
6. Disable Do Not Disturb Mode
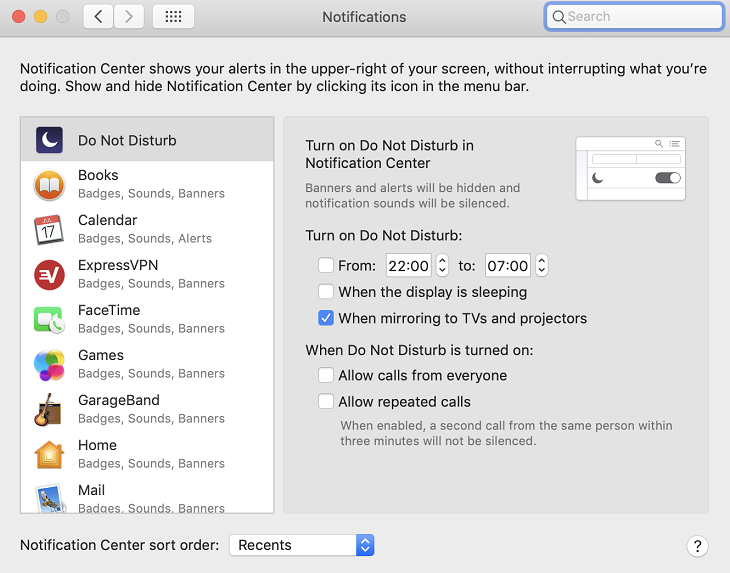
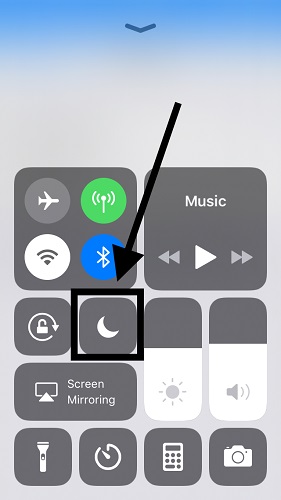
You may note that if your Do Not Disturb mode is enabled for keeping the notification and calls silent, Airdrop cannot work. It is advised to disable Do Not Disturb mode when transferring files; after that, you can enable it to continue. It is easy to turn off Do Not Disturb mode from your Mac and iPhone as it appears as a half-moon logo.
For Mac users, go to the apple icon () on the top left corner and navigate to System Preferences> Notifications> Do Not Disturb on the sidebar.
And for iPhone users, Swipe up your screen and check for the half moon logo. If it is enabled, tap to disable.
7. Network Reset
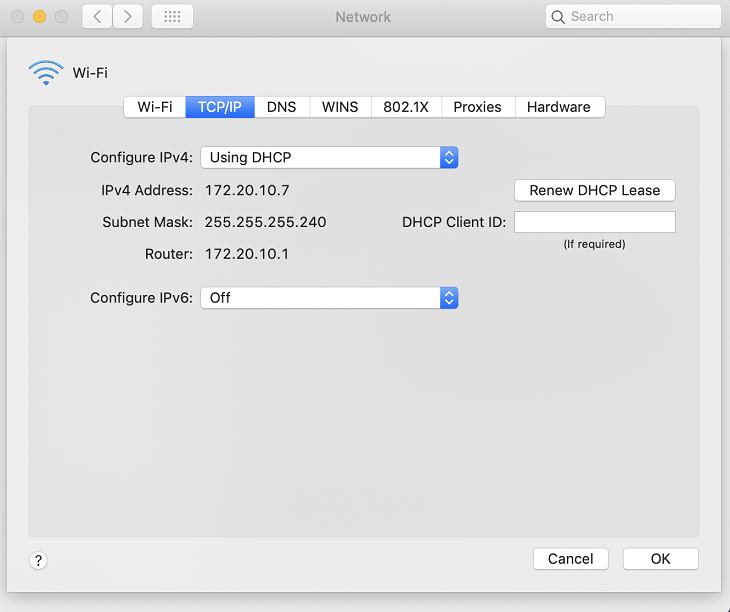
Resetting your network is annoying, and you may skip this step as no one wants to reset their system. But for Airdrop, you must do this if the above steps are not working. Sometimes, resetting your network fixes wifi and Bluetooth problems arising in Airdrop. To reset Your network navigate to the below steps.
- For Mac: Navigate to System Preferences> Network> Advanced tab> TCP/IP tab> Renew DHCP lease.
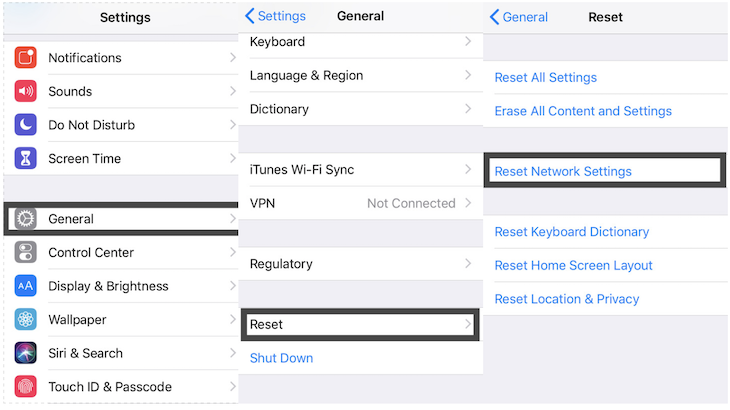
- For iPhone: Settings> General> Reset> Reset Network Settings.
8. Update to the latest version
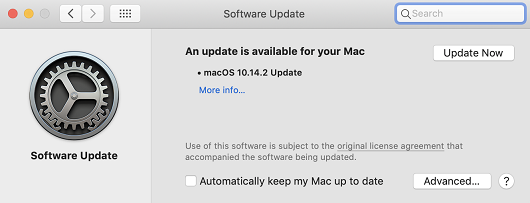
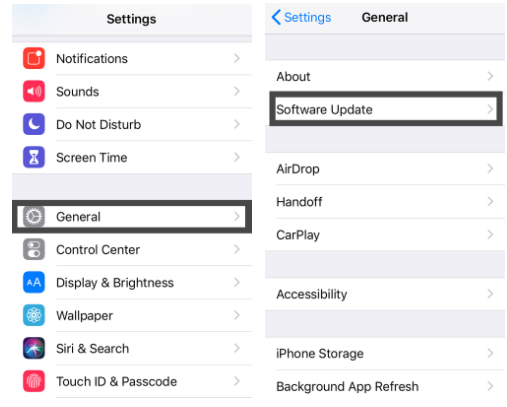
If you followed all the above steps and cannot share a file using Airdrop, then the only option left is to upgrade your system. Upgrading your system may be the issue; settle down, and drop works well. And updating your current version to the latest version is recommended to keep your system up to date. To check your system update, follow some steps.
For Mac: Navigate to the Apple icon ()> System Preferences> Software Update.
For iPhone: Navigate to Settings> General> Software Update.
Make sure your internet connectivity is good, and your device is charged more than half; otherwise, plug in the charger before starting the update.
I hope you fix the issue of Airdrop Not Working on your MacBook and successfully start sharing your files. If a problem still arises, comment below, or if there is any other way you find to fix this problem, then explain it in the comment box. Maybe readers here find your solution best.
For more latest tutorials and software reviews, follow madestuffeasy on Facebook and Twitter.

