Your computer may be turned into a Wi-Fi hotspot so that other devices can connect to it. It may share your Internet access with the connected devices via Internet Connection Sharing. The following is a diagram of how the system works.
You may even set up a Wi-Fi hotspot while tethered to another Wi-Fi connection or wireless device, pooling one Wi-Fi connectivity over another, owing to a hidden online Wi-Fi adaptor function in Windows.

In layman’s terms, a Wi-Fi network formed by a gadget other than a modem is known as a hotspot.
It will be made in our instance from a Windows pc that is linked to the internet through broadband or a dongle.
By establishing a Wi-Fi network, we may enjoy the internet from our Windows PCs with our cell phones and other gadgets.
You can also monitor how many devices are connected to the hotspot. This gives you better clarity for safety reasons.
Even if devices do not have internet connectivity, they can build hotspots; nevertheless, this creates a local network that does not have access to the internet. A network like this may be used to set up an FTP server or transmit data between two devices on the same network.
You may connect your PC’s net connectivity with other devices through Wi-Fi if you don’t have a personal hotspot, and converting your cellphone into a hotspot isn’t possible (like on an airline). This tutorial will show you how to transform your PC into a wireless hotspot.
If you don’t remember the existing password of your internet connection, you can quickly check it in our tutorial.
Install a Wi-Fi hotspot on your Windows 7 computer
Here’s how to make your laptop become a Wi-Fi hotspot if you’re running Windows 7. You’ll need a wireless network extender driver for Windows 7 that’s compatible or updated.
- Create a Command Prompt with administrator privileges.
- In the text box, type: (Replace wifi name with a name you wish to give to your network.) netsh wlan set hostednetwork mode=allow ssid=wifiname key=password Choose a secure, non-pronounceable password as your password.)
- “The provided network protocol has been configured to allow,” the screen should say when you press enter. The hosted network’s SSID has been updated successfully. The hosted network’s user key password has been updated successfully.”
- Type netsh wlan while you’re still on the command prompt. beginhostingnetwork
- To activate the virtual adapter, hit [Enter].
- Right-click your internet connection and choose Properties from the Control Panel > Network and Internet > Network and Sharing Centre > Change Adapter Settings menu. Select “Allow other internet users to connect…” from the Sharing tab. “Select your virtual Wi-Fi connection from the drop-down menu.
In Windows 10, you may share an Internet connection that is either wired or wireless.
You’re lucky if you’re using Windows 10 and the Anniversary Update. With that upgrade, any PC with Wi-Fi may now be turned into a hotspot, regardless of whether the network connection you wish to access is wired or wireless.
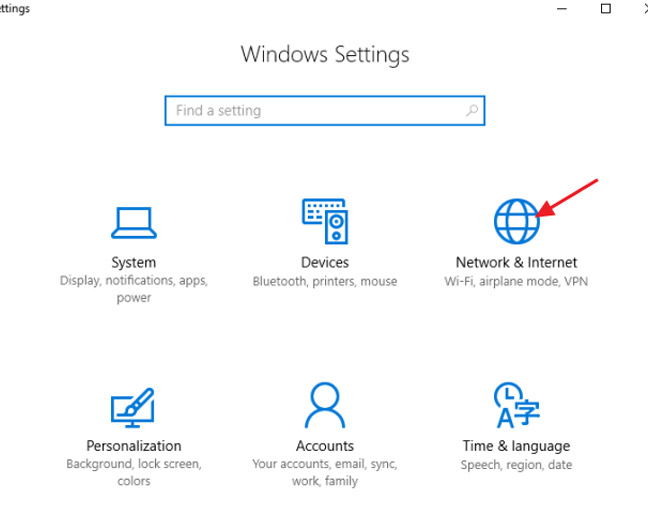
- To start, hit Windows+I on your keypad to bring up the Settings menu. From the General Settings page, go to “Network & Internet.”

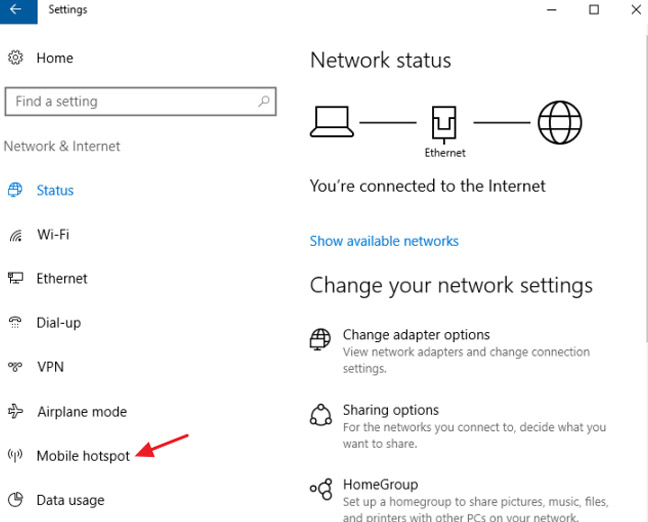
- Click “Mobile hotspot” in the left-hand column of the Network & Internet page.

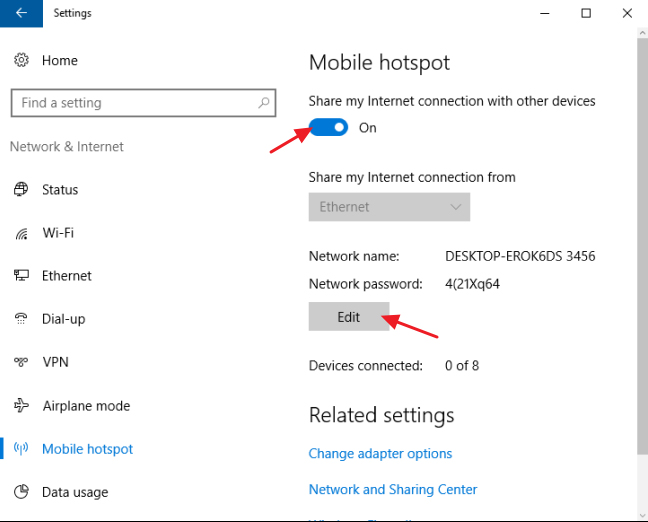
- Turn on the “Share my Internet connection with another device” switch on the right-hand side of the screen. Click the “Edit” option if you don’t want to use the preset network name and password.
- Type the network identity and password you wish to use in the Edit box and click “OK.”

If your internet speed is low, we have a solution. Check out the tutorial – How to increase WiFi speed using cmd?
Install a Wi-Fi hotspot on your Windows 11 computer
Share your Internet connection with other Wi-Fi devices to turn your Windows PC into a mobile hotspot. Wi-Fi, Ethernet, and cellular data connections may all be shared. If your PC has a cellular data connection, it will use data from your data plan if you share it.
- Choose Start > Settings > Network & internet > Mobile hotspot from the Start menu.
- Select the internet connection you wish to share under Share my Internet connection.
- Choose whether to exchange your connection over Wi-Fi or Bluetooth under Share over. Wi-Fi is frequently the fastest and most common connection.
- Select Edit > Change the hostname, password, and band > Save.
- The mobile hotspot should be enabled.
- On the opposite device, go to the Wi-Fi settings, locate your network name, choose it, input the password, and connect.
In Windows 8, you may share your wired Internet connection.
Sadly, the graphical user interface for setting up an ad hoc network was eliminated in Windows 8, rendering it more complex than in Windows 7 or 10. Regardless, the essential characteristic remains. What you have to do is fiddle around with the command line.
You can quickly transform your Windows 8 PC into a Wi-Fi hotspot with Connectify Hotspot and share any online connection with desktops, mobile devices, and pals. The steps are discussed below.
With Connectify, you can easily share your Internet connection.
Connectify and other third-party apps run well on Windows 7, 8, and 10. You may not only share an Ethernet interface over Wi-Fi but also a Wi-Fi connection. You may adjust various features of the connection to match your requirements if you upgrade to some more feature-rich premium versions. However, most individuals will get by with the free version in an emergency.
The steps are outlined in Connectify, but here’s the main thrust: Ensure the Wi-Fi Hotspot option is chosen, then pick the Ethernet or Wi-Fi link from the top-right box before clicking the Start Hotspot tab.
Connectify will provide a username and password, which you should use on your smartphone, tablet, or another device. It’s important to remember that the hotspot may require a few seconds to appear.
If you find any problem if your WiFi disconnecting frequently, you can check this guide.
For the latest tech tutorials and software deals, you can follow us on Facebook and Twitter.