It has been a great convenience to have the automatic updates of macOS system software to the latest version. Once you set up automatic updates, you no longer require to update manually. Every time the latest version launches, your macOS version switches to the latest version.

Nowadays, it is expected that every operating system will have automatic updates enabled. This has advantages because users are spared the trouble of regularly downloading program updates and essential security fixes.
Most smartphone users don’t mind having their devices updated automatically. While it’s true that updates might sometimes cause programs to crash, apps generally keep working after being updated. It’s also unusual that you’re juggling many applications at once. A Mac or PC, however, will not have that limitation.
We always have eight applications running simultaneously. While handy, enabling automatic updates is not a good idea since it requires closing applications before installation can begin. We’d prefer not to deal with that prompt amid the workday since it disrupts our productivity.
Why update macOS?
Apple regularly offers the latest macOS with new features and fixes to previous ones. Moreover, major security updates are the biggest concern, so updating your macOS version is always advisable.
Before you Update or Set the Automatic Update option
Before you enable automatic updates of macOS system software, ensure you have a backup of all your data. We recommend you enable or set up time machine backup on your macOS. It has often been noticed that when users set the automatic update features of macOS system software, they miss some contents and even lose their data.
How to Enable Automatic MacOS System Software Updating?
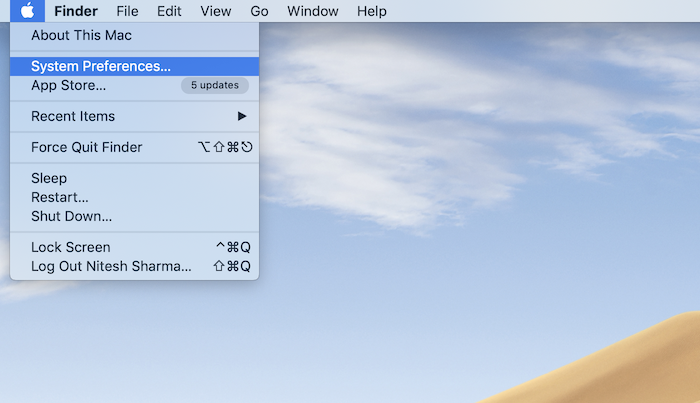
1. Go to the Apple menu on your home screen’s top left corner. Choose System Preferences.
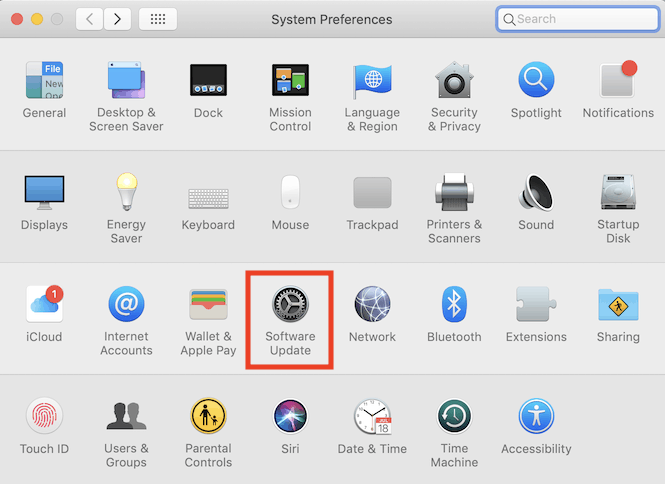
2. From the list, tap on the Software Update option. It may check for the latest updates. Hold on!
3. Check the box Automatically to keep my Mac up to date. This enables your automatic MacOS software to update to the most recent version.
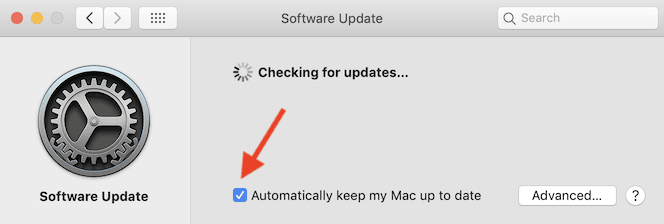
Here you also get some Advance Settings options if you are more likely to choose specific updates, such as updates related to security or others. If you have limited internet data, having particular preferences for updates is a better option.
4. Click on the Advance button.
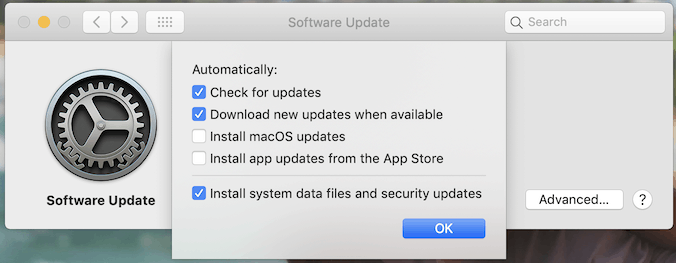
5. New window appears showing the following options
- Check for updates
- Download new updates when available
- Install macOS updates
- Install App updates from the App Store
- Install System data files and Security updates
Select the option you wish to required and click the OK button. Mostly the update happens at midnight or when the Mac is not in use. But an active internet connection is required for the updates.
Once you have checked for automatic updates, Mac automatically scans for the latest Mac OS version periodically and updates it.
I hope you like this tutorial about How to update auto-update for macOS System Software. For all iOS and macOS information and news, subscribe to our newsletter or follow us on Facebook and Twitter.
You may also like: